Showing posts with label GPS. Show all posts

Monday, October 3, 2016

Blueberry Mountain Parts Two and One

This was my second ramble to the vacinity of the top of Blueberry Mountain. This particular Blueberry Mountain is located just south of Kemshall Mountain; a mile from the east shore of Long Lake. I had previously bushwhacked up the mountain from a point on the Northville Lake Placid Trail about 3.5 miles north of the NLPT parking area on Tarbell Hill road. The route I took on that first trip was very steep and it passed through a dense swath of Spruce and Balsam. At the time I decided my route was ill chosen and in fact I came down the north side of the of the mountain where I stumbled on the old trail up Kempshall Mountain. Since then I've been back and followed the abandoned trail to the top of Kemshall. That route climbs to a saddle between Kempshall and Blueberry and I figured that the best route up Blueberry would be to follow the old trail to the saddle and then bushwhack to the top from there. This is indeed the easier way to go.

A low cloud cover limited views from near the summit of Blueberry Mountain.

But the main reason to hike Blueberry again was that my brother Mike was visiting from Colorado and we were looking for a good outing. Something close to town, of moderate length and hopefully with views. Blueberry normally has fantastic views and I figured it to be a 12 mile round trip with the last 1/2 mile a bushwhack up from the saddle. That seemed like the right mix so off we went.

And we did reach the top basically as planned. The bushwhacking stretch was a little harder than anticipated but 45 minutes after we left the old Kempshall trail in the saddle we came to a boulder with a small cairn on top of it. There didn't appear to be any more "up" anywhere around so we declared that point to be the summit. As for the view, the top of Blueberry is in the elevation zone where dense stands of Spruce and Balsam typically dominate. And the cover on summit of Blueberry varies between dense and very dense. However, I knew from my prior visit that open rock slabs exist on Blueberry with great views. Searching around on top we did find some rock outcropings that could have had good views. Unfortunately, as the day had progressed the thick overcast had lowered until visibilty from the top was on the order of a quarter mile. Basically we were staring off into the clouds.

Yup, still limited over on the other side of the summit area.
There it is, the view, looking southwest from one of the open areas near the summit of Blueberry Mountain. This shot is from my prior visit in July of 2014.

Still, I assured Mike that there were two large areas of open rock where good views would normally be found and that maybe we could sneak a view through the clouds from one of those areas. After half an hour of searching, beating through the thickets, I sensed that Mike was starting to doubt that these "open areas" even existed (Ok, it didn't require any great powers of perception, he readily pointed out that this was his theory). Eventually we paused for lunch at a place near where we had first reached the top.

Screen capture from Google Earth showing our route. The orange line is the GPS track. The yellow line is the trail overlay from the New York State Dept. of Environmental Conservation trails map. This version (of the overlay) still shows the trail up Kempshall Mountain. That trail is officially abandoned and while still easy to follow it is not a marked trail.

A broader perspective on our route and the summit of Blueberry mountain. Kempshall is in the background.

Returning home the GPS track told the tale. We had circled around the summit of the mountain and the two large open areas (yes, they do exist) are slightly lower down; one on the west side and one on the east. We had come close to each one but had not gone far enough down the slopes to break out into the open. Oh well, there wouldn't have been views anyway. That is the story I'm sticking with. Now I'll just have to make the pleasent walk down the lake and up Blueberry again to see those great views. It could be worse.

Along the shore of Long Lake near the point where the abandoned Kempshall Moutain trail intersects with the NLPT. The lake is very low, even for this time of year (Oct. 1). The summer has been unusually dry and hot 
Long Lake from near place where the picture above was taken. The bushes in this photo are also in the previous picture. In that one seen from the side. A point was under water when this picture was taken in July of 2014.

Forest scene from along the NLPT along the way to Blueberry Mountain.
Another forest scene. From July 2014.

Near the top of Blueberry Mountain. Previous visitors had built chairs from which to watch the sunset (one might imagine).

Near the top of Blueberry Mountain. July 2014.

Near the top of Blueberry Mountain.

Lichen, near the top of Blueberry Mountain.


Monday, February 8, 2016

GPS Accuracy: Not a simple Matter

GPS accuracy is a tricky topic to discuss. There are a number of factors that limit GPS accuracy and the 'accuracy' of any GPS device varies almost continuously while in use. Even so, a few general rules do apply and I'm going to discuss what I've learned here.

You probably have GPS in your smartphone (and possibly your camera or other devices) but I'm going to focus on hand-held 'recreational' GPS units. This type of GPS receiver can be purchased for under $100 or you might spend as much as $400 (more than that and you are looking at a different class of device). I'm currently working with a Garmin GPSMap 64s that I bought for $230. Over the last 15 years I've purchased three similar devices:

  • The GPSMap 64s - purchased in Jan. 2016, referred to throughout as the '64s'
  • A Garmin eTrex Venture HC. Six or seven years old, the 'eTrex'. Around $130
  • A Magellan eXplorist 210. Fifteen years old. I no longer use this device.

GPS receivers like these are typically described as being accurate to 10 meters (30 feet). But that is the kind of safe generalization that manufactures make to avoid legal disputes. Under favorable conditions these units common fix locations within 10 to 15 of the actual location. Under ideal conditions these units can provide coordinates that are within a few feet of the exact location. If an even higher level of accuracy is needed you can purchase GPS receivers that come with very sensitive external antennas and that make use of ground-based correction signals and post processing of the raw GPS data. At the highest end these unit achieve sub-centimeter accuracy (better than half an inch). These units currently cost thousands of dollars.

But how do you judge the accuracy of locations saved using your GPS receiver? One way is to upload the 'marks' or 'waypoints' captured by your GPS device to a computer for display on top of a map or geographically referenced imagery. I do this using Google Earth. To judge accuracy at the level of a few feet you'll need to record locations at a place that you can identify precisely on a map. The place that I'm using for these tests is seen in Image One. This satellite view from Google Earth shows a complex of buildings located in the Saratoga Spa State Park near my home. The square in the center of the image is a wading pool (it was empty when this satellite image was made). Image Two shows the wading pool with the map zoomed in for a closer look. In Image Two I added a marker place precisely on one corner of the wading pool. The properties dialog then shows the geographic coordinates for that location.

Image One: Building complex in Saratoga Spa State Park. The square shape in the center of the image is a wading pool. For scale, the wading pool is 93 feet on a side. Image captured from Google Earth.

Image Two: The wading pool again, this time zoomed in for a closer view. A marker was added and the properties dialog shows the geographic coordinates of the marker (in the Decimal Degrees format). Coordinates captured using GPS can be compared with a known location such as the corner of the pool to judge accuracy.  Image captured from Google Earth.
As mentioned, using GPS to record coordinates that are less than 5 feet from the actual location typically requires the use of some type of correction technology. Correction is needed because various factors, some of which vary locally, interact in ways that reduce GPS accuracy. GPS satellites reside in geo-synchronous orbits --the satellites orbit in a constant position relative to the surface of the earth-- and the accuracy of GPS hinges on knowing the precise orbital position of each satellite. But those orbits are constantly perturbed by outside forces and regular correction is needed to compensate for this. This type of correction is built into the system but it is not instantaneous. At any given point in time some satellites are not exactly where the system thinks they are and this reduces accuracy. Which is one reason why more is better when it comes to the number of satellites your GPS receiver can use. Signals from additional satellites can be used to average out some types of errors in the system.

To get really accurate locations your device needs to make use of signals from ground-based stations. These stations broadcast signals that your GPS receiver can incorporate into its' calculations and these stations don't move. The location of the ground based stations is known with great precision. Some consumer GPS receivers, including the Garmin GPSMap 64s, can use the WAAS ground correction network but I'm not clear on when this is used and the effect that it has on the accuracy of locations recorded using the 64s, The underlying problem with ground-based correction is that you need to be within the range and coverage area of a transmitter. Currently this is common in urban areas and uncommon away from cities. [Note: I've really over-simplified this, follow the link above for more detailed information]

Really good accuracy also requires the use of a highly sensitive antenna and this is probably the most significant factor in limiting best case accuracy in low cost GPS receivers. This is especially true when using GPS in the dense forests of the Adirondacks. Your GPS receiver must receive signals from at least four satellites (three provides a rudimentary fix) and these signals can be blocked by a dense tree canopy as well as by mountains or buildings. Intriguingly, the GPSMap 64s has a port that allows for the use of an external antenna. I have not yet begun to explore what that might mean in terms of the best accuracy level this receiver can achieve. 

But, without further ado, let's look at some comparisons. I recently did an informal comparison of the accuracy of locations recorded using a Garmin GPSMap 64s compared results obtained using the older Garmin eTrex. I marked the same locations using the GPS in my smartphone to provide an additional set of comparisons. Image 3 shows the results.

Image Three:

I recorded the location of each of the four corners of the wading pool shown in the images above using each device. Since the corners have indents I marked the exact locations with the red circles to show where I took the measurements. Locations recorded using the 64s are represented by the green markers (note that the marker points are the at the recorded location). The locations recorded using the eTrex are represented by the purple markers. And the locations recorded using my phone are represented by the pink markers. As you can see, the 64s and eTrex achieved similar levels of accuracy. The eTrex was actually the winner; the mark closest to the physical location was recorded by the eTrex and that mark is about five feet away from the map image location. However, the 64s was more consistent and that also could be used to decide which device is "more accurate." This was a bad day for the phone. I usually get decent results using the GPS in my phone but on this day at that place it was all over the map. One mark, labeled Phone-3, seen on the left side in the image, was off by almost 200 feet. It should have been around the corner of the wading pool at lower right.

The extra mark at the upper right, labeled "E4b" was recorded by the eTrex and I included it to support my contention that the 64s was more consistent. I actually recorded two marks on each device; standing in the same spot. These marks were generally very close to each other but in this one case the first mark recorded by the eTrex was 25 feet away. Inconsistent.

A few conclusions can be drawn from this test. For starters, while the place and conditions at the time I recorded the data were favorable, the results are not particularly impressive. Both of the Garmin receivers marked the locations at points within ten feet of the actual, but only a couple were with five feet. I plan to return at a different time of day to repeat the test to see how much the results vary. Different levels of accuracy are to be expected because at different times your receiver will obtain GPS signals from different satellites. That the eTrex unit produced the closest marks could actually be an accident. I've been comparing the fixes obtained using both devices informally for over a month and in nearly every case the 64s has performed better. As the title of this post says, GPS accuracy is not a simple matter.

Image Four

Recording fixed locations under controlled conditions is interesting, but my main use for these devices is to record tracks while hiking in the Adirondacks. Image four shows a portion of a track recorded by both devices on a recent outing. The light blue line represents the track recorded by the 64s and the purple line is from the eTrex. The 64s track is more accurate and more precise. This comparison is interesting because it removes bias from the comparison (More on that in a future post).

My contention that the the tracks recorded by the 64s are more accurate comes from knowing the details of this outing. In the lower part of the image, the four distinct lines should overlap almost perfectly because that portion of the route follows a path that I walked along on the inbound portion of the hike and then again, in the opposite direction, on my return. My actual route might have varied by a few feet in places but those lines should basically overlap. In places there could be differences of a few feet between the inbound and outbound tracks but the two tracks should nearly overlap.

Measuring the gap in Google Earth I find that the it averages about 15 feet for the track recorded by the 64s and by 40 feet for the track recorded by the eTrex. In this context the 64s was significantly more accurate.


Wednesday, January 20, 2016

Along the Hudson and a new GPS Receiver

In this post I'm going to touch on three regular topics for this blog:
  • Hiking in Moreau Lake State Park (MLSP)
  • Old Trees
  • GPS Technologies
Looking across the Hudson towards the Palmertown ridge (and the main body of Moreau Lake State Park). Spier Falls Road is visible in the foreground on the far shore.
I got out yesterday (Jan. 18, 2016) for a hike on the east side of the Hudson River in Moreau Lake State Park (MLSP). Starting at an informal parking area on Call Street (between Queensbury and Corinth) this was a bushwhacking trip of just under six miles (round trip). Even so, it was a rather tough day. It was cold (mid-teens at best), the ground was covered with a layer of solid ice with an inch of snow on top and, and the route crossed a series of deep ravines cut by the streams that flow down from the surrounding hills into the Hudson. Only the last mile; from the point opposite the Sherman Island boat launch on Spier Falls Road to the Spier Falls dam itself was easy walking. Worth mentioning is that I could not have made this trip without the "micro-spikes" that I now carry on all Winter outings. These "boot chains" have exceeded my expectations at every use (available from many sources, here is one). 

The area in question is across the Hudson River from the main body of MLSP and it is little known and little used. Probably the best access is from Hawk Road (previous post here), but parking at Hawk Road is a problem in the Winter and it's a lengthy walk from there to the section east of Spier Falls dam. This area is not wilderness by any stretch, but it is wild and in places the terrain is very rough. There are numerous old logging roads and places once cleared for agriculture throughout this section and the foundations of abandoned structures are seen in several places. 

Foundation of an abandoned structure. The area around this foundation is relatively level and large enough for a field or pasture. The stand of same size trees indicates that this was cleared land in the past. Judging from the size of the trees, that was not the distant past. The agricultural use of this land was likely abandoned only in the past 30 to 40 years.

An ancient Maple

On the fringe of a once cleared agricultural area I came across a tree that has got to be one of the oldest in Moreau Lake State Park. It's a Sugar Maple (I think, mid-winter ID), and this tree is clearly in its twilight years. I didn't have my tape measure with me, but it is easily four feet in diameter. 

Sugar Maples can live to be over 300 years old and a tree of this size, with bark weathered and aged in this way, could be in that category.

This tree was located at the edge of an area that was probably cleared for grazing. And that's a common scenario for witness trees in the northeast. When the land was initially cleared trees growing along the edges of fields and pastures, and along stone walls, were left in place and became part of the agricultural landscape.

GPS - Garmin GPSMap 64S

One of my purposes for this outing was to put my new GPS receiver to the test. I've just purchased a Garmin GPSMap 64S. I've been thinking about acquiring a new GPS receiver for a while, but nothing I was seeing justified the cost. Then the clever robots at Amazon dropped an ad for the 64S on a web page I was viewing. At $230 the deal was too good to pass up.

Initial testing at Spa State Park over the weekend looked very promising, but I really wanted to put the unit through its' paces on a longer hike through a forested area. Not surprisingly, the 64S produces superior results on every front. For one thing, it's easier to use; no small consideration when it's 15 degrees with a stiff breeze blowing in your face. And while it is slightly larger and heavier than the eTrex it has a much better antenna. This is important when operating in thick forests and steep terrain.

It's not trivial to compare the accuracy of GPS units, at least not in the under $1000 dollar category where you have limited control over which satellites the receiver makes use of, but 64S has several features that should provide better and more consistent accuracy. The GPSMap 64 series receivers can make use of both the US GPS system as well as the Russian GLONASS satellites. All other things being equal more satellites should produce better results. The 64S is also capable of using the WAAS/EGNOS ground correction system. That's a big topic in its' own right and I'll discuss that further in a future post.

There are also a number of feature improvements, the most significant of which is that the 64S allows you to control the frequency at which it stores new locations when recording a track. This particularly useful when recording hiking routes. I set the 64S to add a new point to the track at one meter intervals; meaning that as you move along it stores one point per meter of travel (it can also be set to use a time differential). Set in this way you get a lot of data but it produces a much more detailed route than I could previously capture. This also avoids the annoying problem that I encountered with my older Garmin unit. When I would stop for a break, or for lunch, the older unit would continue to add points to the route based on a time differential (every 15 seconds would be my guess). So you would end up with a large number of points clustered around the location where you stopped. These could be cleaned from the data, but it was one more step in the process of producing a clean representation of the route.

I'm working on a detailed comparison of the performance of the 64S with my older receivers but the summary is that I don't know how I was getting by before.

Moreau Lake State Park, east of the Hudson River. The light blue line is my route. The heavy red line is the boundary of the section of the park that lies east of the Hudson River. Call Street is represented by the yellow line. The main section of the Park is on the west side of the Hudson, and Moreau Lake is just out of the area of the image at the lower right corner.
  • Marker A: Parking on Call Street
  • Marker B: Stream Valley
  • Marker C: Spier Falls Dam
  • Marker D: Sherman Island boat launch site on the west side of the Hudson (for reference)
  • Marker E: The Hawk Road Area
You might notice from the map that I wandered outside of the Park boundary at one point. That was inadvertent. At that point along this route you have to get over a steep-sided gully. Steep enough that given the icy conditions it was a challenge to find a place to get across. Most of the year it would be easier to stay in the park and get through this section.

A Section of the route showing each point captured by the GPS. Click the image to see it at full size. The GPSMap 64S, set to add a point to the track at one meter intervals captures a highly detailed representation of the route. Map Images from Google Earth.


Wednesday, December 30, 2015

Bushwhacking Rules One and Two - The Woods Don't Care

As a loyal reader of this blog you know that when I go hiking I sometimes go off trail and do a bit of bushwhacking. I like to drudge up old and forgotten Adirondack routes and trails, and this fits nicely with searching around for patches of old growth forest or finding Beech trees that have BBD resistance. I commonly plan my routes so that my path at some point intersects a formal trail that I can follow out of the woods. Occasionally, when the trail I am seeking does not appear as expected, an alarming thought crosses my mind; "What if I cross the trail without realizing it?" This is usually accompanied by the even more disturbing thought; "What if I already crossed the trail and I'm heading off into the un-tracked wilderness? Oh no..." (then I recall that it is the Adirondacks, it might be wild but it is hardly un-tracked)

This has happened a few times but the the outcome has always been the same. Within a few minutes I step onto the the trail I was looking for. And this inevitably brings a smile because when you are bushwhacking even a lightly-used marked trail looks like a four-lane highway through the woods. From this I've developed a rule of thumb (Rule Number One of Bushwhacking); "You won't miss the trail, you'll spot it when you come to it, keep going." This rule has served me well because doubt can be a serious problem in its' own right. And doubt --edging towards panic-- has been the undoing of many a "lost" hiker or hunter.

This year I learned an interesting variation on my rule, which is; "you won't spot the trail if you are walking in the wrong direction." As you might imagine this corollary rule didn't appear out of the blue. I was attempting to reach Twin Ponds from the Thirteen Lake-Puffer Pond trail but tough conditions, and a late start, had caused me turn back short of the ponds. Heading back to rejoin the trail, which was less than a mile away, I decided to take an alternate route to avoid swampy terrain I had crossed on my way towards the ponds. After beating my way through rough terrain for nearly an hour I started to question my "rule number one of bushwhacking". The terrain didn't seem right and I really should have rejoined the trail by then.

I generally avoid using GPS for route finding but I had been recording my track using the GPS in my phone. So I pulled it out to have a look, and what I saw surprised me. If the GPS track was correct, I was going the wrong way. Only then did I pull the compass out of my pack and check my direction. Damn, I was traveling west when I wanted be going north. Correcting for this I came upon the trail after only a few minutes. I had been traveling parallel to it for some time.  And the first rule of bushwhacking was confirmed. No way I would have crossed that trail without knowing it. (smile)

There was a lesson learned from this. It wasn't just over confidence, heck I hadn't even considered the possibility that I might be walking in the wrong direction. It was really a combination of hubris and laziness; the source of so many disasters, big and small. It was heavy overcast that day so there was no sun in the sky to help stay me on course and I hadn't bothered to check my compass. So now I have a new rule --Rule Number Two of Bushwhacking-- check your compass even if you already know the direction you are traveling.

I almost always have a couple of GPS devices with me, so why not just use GPS for route finding and eliminate the guess work? For starters, all the experts say that you shouldn't do it. Guidebooks, DEC and ADK websites, articles in the newspapers about hiker rescues, etc, all warn against "relying on electronic devices" to find your way when hiking. But this advice runs counter to common experience. Most of the time any decent GPS device, either a dedicated unit or the GPS feature built into a smartphone, can provide your location within a few yards. So why not use them?

The problem is that there are a variety of ways for these devices to fail or to give you incorrect information. Usually at a most inopportune moment. Still, the warning should really be that you should not trust to GPS alone to avoid getting lost. If know how to use your GPS device, and how it can fail you, then your GPS device is another tool you can use for route finding. I was going to conclude this little tale by saying "here are all the ways that GPS can fail you in the field; I've learned them all first hand." But that would have been foolish, I'm sure there other failure modes that I have not yet discovered. So here are some of the ways in which GPS can fail you in the field.

  1. Your phone probably has a useful GPS capability but you must enable the "Location" feature for it to work. Setting your phone to record your track is pretty easy these days but if location is off it won't work. A good App should warn you if Location is off but this warning is easily overlooked. A good practice is to check your track on the phone periodically to make sure that all is well. Otherwise you might find that (the electronic equivalent) of birds have been following you through the forest and eating the breadcrumbs you have dropped. 
  2. Many people turn "Location" off because GPS puts a heavy load on your phone battery. My phone is over two years old and with "Location" turned on the battery lasts only six to eight hours; not enough for a full day of hiking. I carry a small auxiliary battery that I can use to recharge my phone in the field, but even this can go wrong. I recently returned from a trip to find that the track I thought I was recording ended 2/3rds of the way through the hike. At one point I had noted that phone battery was getting low and had plugged in the external battery. I had forgotten, however, that if the battery level in the phone falls below a certain level (10% I think) the phone disables the location feature to save itself (sort of HAL like). This had happened. The catch is that plugging in the external battery does not re-enable the GPS capabilities of the phone. So the later part of the track was not recorded.
  3. The battery life of hand-held GPS units varies considerably and cold temperatures reduce the power output of all batteries. Lithium cells are much more effective in cold weather and should be used in GPS receivers. And, if you are using your GPS for anything more than amusement, you should carry spares (thanks Mom).
  4. Anticipate that you will not have Cell service while hiking. The GPS in your phone will work because the GPS system does not rely on the cellular network. But this means that your phone will not be able to download maps while you are in the field. To see your location on a background map you must plan ahead and download the appropriate map imagery before you go. Otherwise you might find your phone showing your location as a dot on a blank background. It is surprisingly difficult to get the right maps onto many devices ahead of time so verify that you have the maps you need before you leave.
  5. Beyond dead batteries and software failures any electronic device you take with you on a hike can fail. A common cause complete failures is having the device in your pocket when you wade into a lake or river and it's deeper than you thought. Oops.
  6. Depending on where you are hiking you may find that your device cannot lock onto the GPS satellite network to give you an accurate location. Dedicated GPS units that can use both the US GPS network and the Russian GLONASS system are the best defense against this problem. The more satellites your receiver can use the better your chances of getting a signal.
  7. Finally, there are a surprising number of ways for the compass feature of your GPS unit to be completely wrong. With practice and care you can get the correct heading from a GPS compass but I have learned to be skeptical of GPS-based compass readings.
The best hedge against all of these potential problems is to carry a standard compass, and the appropriate maps, and know how to put them to use.


Sunday, August 9, 2015

The Pine Orchard: You Know When You Are In It

The Pine Orchard is a well known stand of old growth White Pine and Hemlock near Wells (NY). If you read this blog you know that I'm always on the look out for the big old trees, so a visit to the Orchard was long overdue. I'd read that the Pine Orchard contains trees up to seven feet in diameter but, I have to admit, I was skeptical. I wondered if trees, like fish, get bigger with each telling of the tale. I was prepared to be underwhelmed by the Pine Orchard. Happily, I was wrong. The Pine Orchard is impressive and these may very well be the largest and oldest trees in the southern Adirondacks.

But how big --exactly-- are the pines in the Pine Orchard? I measured a few trees and the largest one I found has a diameter of 51 inches; just over four feet. I took this measurement by stretching a cord around the tree four and a half feet above the ground. The distance on the cord measured 161 inches and dividing that by 3.14 yields the diameter: 51 inches. That's not the six to seven feet that some have reported but I might not have measured the very largest trees. And while measuring the diameter at four and half feet is standard practice in forestry circles, others might have done it differently.

I'm interested in the history of the Adirondack forests and the large old trees have stories to tell. So I look for them when I hike. Over the past several years whenever I've spotted a large tree I've noted the location and estimated the size. Now that I've refined my measurement technique I see that my past estimates may have tended towards the high side (No, Dad, this does not apply to fish I've caught in the past). I carry an old ski pole as a walking stick and I've used the pole as a gauge for estimating tree diameters. I now see that this technique is insufficiently precise. In the Adirondacks, trees with diameters of 36-40 inches are found in many places. Trees of that size will typically be more than 125 years old and a stand containing many trees of that size may have been passed over, or selectively logged, in the first wave of industrial logging. That first wave took place after 1850 and continued into the early part of the 20th century. You can also find trees with diameters larger than 40 inches scattered about in the Adirondacks, but these are much less common. These trees were almost certainly standing before 1850. The really big and old trees, with diameters of 44 inches or larger, are rare. The Pine Orchard contains a number of trees in the 44-48 inch range and estimates that I've seen place the age of the stand at over 200 years. (Note: the correlation between tree size and age varies with species and growing conditions).

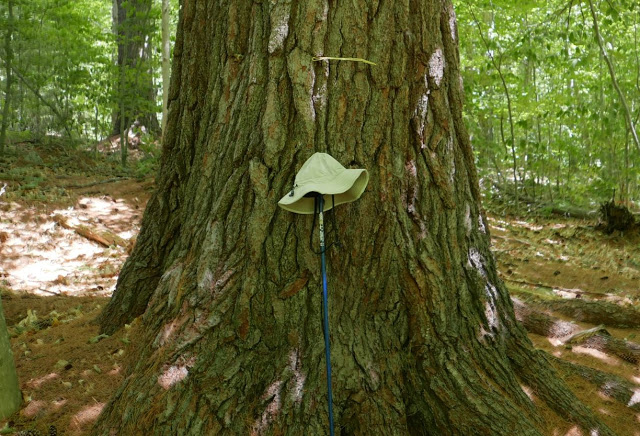
Image One: A large White Pine near the point where you first reach the Pine Orchard Stand. The strand of yellow yarn is one foot in length.

The Pine Orchard: Old Growth Forest


The Pine Orchard is old growth. At 200 years without external disturbance the forest has reached the climax stage in terms of ecological succession. For this location, and given whatever circumstances protected it originally, that means mature White Pine with some Hemlock and a few old hardwoods mixed in. Stands of old growth pine are often compared to a cathedral and that description applies to the Pine Orchard. The forest floor is blanketed with a deep layer of pine needles that absorbs sound and this is an airy, quiet, place. I was there on a very warm day and it was pleasantly cool under the cover of the large trees.


Image Two: The cathedral in the pines. The forest floor is covered with a two century accumulation of pine needles. Smaller trees are mixed in but the canopy is dominated by the large White Pines.

The Trail and the Hike


The route I followed leaves the Pumpkin Hollow road at the Murphy Lake trailhead. As with the the trail to Wilcox Lake this route is marked and maintained as a snowmobile trail. The 1994 ADK guide to Trails of the Southern Region described this trail as indistinct and hard to follow. That Guide advised that this route should be attempted only by hikers skilled with map and compass and it went so far as to say that the trail was not recommended for parties of fewer than three people. 
Image Three: From Google Earth. The entire route covering 5.9 miles each way.

That guide was written over 20 years ago and much has changed. I don't know whether the warning was justified when the book was written, but it is not true today. The route generally follows old woods roads and it for pleasant walking. There are a couple places where arrows (signs) point the way. Not because the trail is indistinct but because multiple old woods roads intersect and it could be difficult to pick the correct route. Interestingly, the warning from the ADK guide was carried over to a much newer map. My favorite trail maps these days are the "Trails Illustrated" Topographic Maps produced by the National Geographic Society. The Northville/Raquette Lake map covers the southeastern Adirondacks and that map restates the warning about parties of "at least three persons" word-for-word.

There is also a meaningful discrepancy in the length of this route as stated on signs and as printed in various guides. As measured using GPS my hike covered a total of 11.8 miles. This included a bit of wandering around so the sign board at the road which states the distance to the Pine Orchard as 5.6 Miles is reasonably accurate. The 1994 ADK Guide lists the distance at 6.6 miles one way. And a third distance, derived by adding up distances seen on signs along the way, yields a total of 4.2 miles. Applied to the round trip, the difference between the shortest and longest mileage is over four miles. That's a serious lack of accuracy.

There are two apparent sources for the uncertainty. The first is that there is no distinct point or boundary to mark your arrival at the Pine Orchard. The lack of a clear "here it is" location accounts for a tenth mile or two of the discrepancy. This is a question of precision. Lacking a distinct end-point it's difficult to measure the distance to the tenth of a mile precision typically used on trail signs. The second consideration is that over the past 30-40 years the trail has been re-routed, probably more than once. The 1994 ADK Guide alludes to this noting that the trailhead had been moved to avoid a crossing of private land. This is also evident in an old sign seen at the junction with the Flatters trail. The sign says that it is 2.6 miles to the "Willis Lake Road" but the trail doesn't go to the Willis Lake Road. That was probably the original starting point. If the sign stated the distance as "a few miles" it would be more accurate but not very precise. As it sits, it is neither.   

Image Four: Stanton Miles: When our children were young we would take them hiking and the first thing they wanted to know was; "how far is it?" To which I would respond "a couple of miles." It took only a few outings for them to realize that my "couple of miles" could be anything from two to five miles. That answer is accurate but not very precise and my scale became known in the family as "Stanton Miles." If you use Stanton Miles the difference between what appears on the sign and the actual distance of four miles is accounted for.

Uncertainty, Accuracy and Precision


Measuring the diameter of a tree is pretty easy. And collecting measurements from many trees is a straightforward process:
  • Measure the tree
  • Record the location
  • Record the species
  • Note unusual or complicating factors
  • Repeat
That sounds easy enough, and it is easy. Which is why I am continually surprised by all the different ways that uncertainty creeps into the data. Part of it comes from doing this work in the Adirondack Biting Insect Preserve. During the warm months you encounter many many small complications and distractions and for the rest of the year your fingers will be numb making it difficult to write out notes. But sometimes I run into more specific issues:
  • Diameter: What about double-trunk trees? Or trees in difficult locations? What if there is a branch or some other oddity at the 4.5 foot height where I want to measure?
  • Location: Assuming that the accuracy level of your GPS device is good enough, and assuming that you have a good signal from several satellites, and assuming that you correctly note which location goes with which tree, it nothing more than the push of a button.
  • Species: I'm familiar with most tree species seen in the Adirondacks, especially the species that get to be big. Still, when I have gone back and looked at the same trees a second time I've found that I get some of the them wrong.
  • Notes: Some days I do a good job of recording the unusual or complicating factors and some days not so good. And this information often turns out to be important when trying to draw conclusions from a body of data.
On one point I have no doubt. All non-trival data contains errors and considerations of precision and accuracy are relative to the intended use. These are the sources of uncertainty.

A Couple of Miles: I was just being accurate


As often happens, the use of a tool under less than ideal conditions leads to a deeper understanding how the tool works. Using GPS to record locations and to record the tracks I've follow has given me a deeper understanding of how the system works. I'm going to return to this topic in the future but a few key points go right along with the theme of this post. First, take a look at image five. The lines show a short section of the track captured by my GPS receiver on the hike to the Pine Orchard and back. The line on the left was from the inbound leg of the trip and the line on the right is from the return trip. I walked the same path both ways so it's odd that the the lines are so far apart. To get to the bottom of this you need to know something about how I hike.

I took much longer to complete the trip to the Pine Orchard then I did on the return and this is typical for me. And this was not because of the terrain. The route crosses a couple of small ridges but there is very little difference between the elevation at the turn around point. It's counter intuitive, but I typically travel at a slower pace on the way in because I'm fresher. On the way in I stop to record measurements, I take photos and I generally take more time to enjoy the forest the scenery. On a hike of this distance by the time I'm half way back to the car I'm starting to get tired. And this is the counter-intuitive part, I tend to walk faster and I move along without stopping. On this particular day, it was hot and by the time I reached the area shown in image five I'd been hiking for over five hours. It was also into the early afternoon and I was I not hiking alone. I was traveling with dozens of new (and now really annoying) friends that I'd made along the way. Deer flies, midges, mosquitoes and a few too-stupid-to-just-give-up-and-die black flies. The bug spray that had been mostly effective earlier in the day was no longer working. 

Image Five: GPS Accuracy 
The lines in the image show a short segment of the track captured by my GPS receiver on the hike to the Pine Orchard and back. The line on the left was from the inbound leg of the trip and the line on the right is from the return trip. I was walking on the same path for both legs of the journey, so you might expect the lines to be very close to each other. (Map Image from Google Earth)

A GPS track like the one shown in the image is recorded as a series of points. Every second or so (this will vary based on the device) the GPS receiver calculates your location and stores the coordinate pair representing that location.  When you stop the receiver gets extra time to correct for errors so stopping periodically improves the accuracy of the track overall. This is especially true when walking through a dense forest where the strength of the signals is reduced by foliage. In image five I added a note to a place where it looks like I took a short side trip off the trail. But I know that that never happened. What did happen is that the GPS recorded a couple of points with much lower accuracy and those points became part of my route. If I was planning to use this track as data I would need a method to clean up these kinds of errors. 

There are many factors that limit the best case accuracy of GPS. A GPS receiver captures signals sent by satellites orbiting the earth and when the receiver has signals from at least three of these satellites it can calculate your location. The U.S. GPS system uses a constellation of 32 satellites positioned so that there should always be at least three satellites above the horizon and "visible" to a GPS receiver located anywhere on the earth. Under good conditions a typical consumer GPS receiver can fix your location to within about 10 yards -30 feet- using signals from three satellites (four are required to also calculate your elevation). At that accuracy level you use the coordinates calculated by the receiver and place a point on a map. Then you draw a circle with a diameter of 30 feet around the point. Your actual location lies somewhere in that circle. 

Depending on what you are trying to do that may or may not be accurate enough and it's usually possible to get much more accurate data. For instance, it's common for there to be more than the minimum of three satellites available to your receiver. Modern GPS receivers including the ones found in most smart phones, use the "extra" satellites to average out some of the errors that otherwise limit GPS accuracy. For example, when I save a waypoint (the coordinates for a single location) using my Garmin GPS it tells me how accurate the fix will be based on the set of satellites available to it. The use of additional satellites and averaging commonly improves accuracy into the ten to twenty foot range. On the other hand, dense foliage, cliffs, mountains and other obstructions reduce accuracy or prevent the receiver from getting any fix at all.

The point is that data taken from measurements is always uncertain to some degree and the level of uncertainty varies based on the specifics of how you gather the data and your intended use. You have to ensure that your data is accurate enough for the intended use and you have to avoid mis-representation by overstating the level of precision. When I use a cord to measure the circumference of a tree, if my measurement is accurate to within one inch then I can state the diameter in inches. Dividing the circumference by Pi to get the diameter will almost always yield an answer with a remainder, something like 45.3. But the .3 must be thrown away. The accuracy level of my measurement does not support that level of precision. If a trail sign states a distance as 2.6 miles, then assuming typical rounding to the nearest tenth we can say that it's accurate if the actual distance is between 2.55 and 2.65 miles. Assuming, of course, that it's the correct sign for the trail you are on. My GPS gives me coordinates with 6 decimal places of precision. That's precise enough to separate locations that are just inches apart. But the device is not nearly that accurate and the last digit (and maybe the last two) should be discarded. The extra precision is meaningless at best and misleading at worst. Whenever we take measurements there is uncertainty and the level of precision we use should not overstate the accuracy of our technique. 

You see kids, when I said it was a "couple miles" I was giving you the most accurate answer that I could. 


Friday, July 24, 2015

Google Earth and KML - Part Two (GETECH)

In the previous post I introduced the topic of working with geographic data in the KML format. As mentioned there, KML is the native data format used by Google Earth (GE) and it is widely supported by both GPS devices and software. I won't attempt to cover all the gory details of working with and editing KML in this series of posts (resource links at the end), but there a few practical things I've learned about working with GPS data in the KML format that I want to share.

As a basis for this discussion I'm looking at two GPS tracks I recorded on a short Kayak trip on the Kayaderosseras Creek near Saratoga Springs. One was recorded using my trusty Garmin GPS and the other was recorded using the GPS receiver in my camera; a Canon Sx260. I'll discuss and compare the accuracy of the two tracks and touch on some other issues you might encounter while using GPS to collect geo-referenced data for use in your projects.

The first issue is evident in the screen shot below (Image 1). The red line represents the track captured by the GPS receiver in the camera. The purple line shows the route recorded by the Garmin. The obvious difference is that the purple line extends beyond the point where the red line stops. That's because the red line stops at the place where I put the kayak into the creek and later took it out (at the Spa State Park Canoe Launch Site on Driscoll Road). I paddled upstream for a mile or so and then floated back down. I had both GPS units turned on and both units recorded the path. The purple line continues because when I got back to the launch point I forgot to turn off the Garmin GPS. So it recorded a track for the short carry from the creek up to the parking area and for my drive home. That data is not useful so the first thing I want to do is remove it.

Image 1: Screen capture from Google Earth. The two lines (red and purple) are GPS tracks recorded simultaneously on Kayak trip on the Kayaderosseras Creek near Saratoga Springs (NY)

I could do that by editing the track directly in Google Earth. That would be easy but it would be extremely tedious. There are several mouse clicks required to delete a point and there are a lot of points to get rid of to clean up this problem. You can see this in image two. For this screen capture I turned off the display of the track recorded by the camera (the red line) and selected the purple track for editing This makes visible the points recorded by the GPS. Each recorded point is represented by a red dot in the image and as you can see, there are a lot of points in just this short section of the route from the creek to my house. To remove this part of the track by editing it in GE you'd click on each points, select Delete, confirm the deletion and repeat. Lots of repeats.

Image 2: Screen capture from Google Earth. With the display of the track recorded by the camera (the red line) off, the track represented by the purple line was selected for editing. This allows us to see the individual points recorded by the GPS receiver. 
A better alternative is to open the KML file containing the track in a text editor and remove the unwanted points from the file. Once you have the hang of it you can edit the data in the file very quickly. There are few steps involved in this process which goes something like this:
  1. Export the track to a file. In Google Earth right click on the item in the Places pane, select Save Place As. Be sure to select KML from the format drop down so the file is saved in the KML format.
  2. Open the file in a text editor or an XML editor (I use Notepad++; a free and open source editor that is popular with programmers). You may need to configure your editor to recognize that the KML file is an XML file. That should allow the editor display the contents with nice formatting.
  3. In this case, removing the points I don't want comes down to removing all the points where the latitude is greater than the latitude of the put-in point. I'm in the northern hemisphere --so the latitude coordinates increase as you go north-- and all the points I want to keep are south of the put-in. Image three shows the map zoomed in on that location with the properties dialog for the point displayed. The properties dialog shows the latitude and longitude of the marker (and the location). This is how I got the latitude I will use as the basis for my edits; any point with a latitude greater than 43.034293 can be removed from the file. A potential complication is that that the coordinates in the KML file are stored using the decimal degree format. That's as you see it in the dialog seen in image three, but that representation is not the default for coordinates in Google Earth. The default is to represent coordinates in the Degree/Minute/Second format; like this: 43°02'03.4548" You can change the representation used by Google Earth using the Options dialog on the Tools menu.


Image 3: Screen capture from Google Earth. Viewing the properties of a marker added at the location of the start/end point of the trip. The properties dialog shows the coordinates of that point.

Once you have a KML file containing your track, and you have a way to identify the point(s) to remove (in this case, latitude > 43.034293) you can remove the unwanted points from the file. To do this you do need to know a little bit about the XML data format and how to edit data stored in XML, but there are many introductions to XML available on-line and I've included references at the end of this post. Also, if you've done any work with HTML this will all look familiar. XML data elements are placed inside of tag pairs and you must delete the entire tag pair or you wil break the formatting of the file (and GE will complain when you try to reload it). You'll also need to recognize how the coordinates are represented. An example from my file looks like this:

<gx:coord>-73.79277999999999 43.034036 102.52</gx:coord>

The coordinate of the location is represented by three values with a space placed between each value (it might be hard to see the space; -73.79277999999999<space>43.034036<space>102.52). The values are:

-73.79277999999999longitudea "west" longitude represented as a negative number
43.034336latitudea "north" latitude represented as a positive number
102.52elevationmeters above sea level

As discussed in the previous section, I want to delete any point where the latitude is greater than 43.034293, so this point can be removed from the file. The points are stored in the file in order, so once you find the place break between what you want and what you want to remove you can select all the bad rows and remove them. If editing data in this way is familiar to you then this should get you started. If this is entirely new then you may need more help. Look at the references or ask a friend who knows about this stuff.

With unwanted data removed from your file there is one final step; opening the file in Google Earth so you can see the results of your work. In Google Earth select "Open" from the File menu and find your edited file on disk. If you get warnings about errors check the file over for mis-matched tag pairs. That's it, you can save the file in your Places folder so that Google Earth reopens it automatically or you can reopen the file when you need it in the future.

This post is already rather long so I'm going to cover the other topics I raised at the start in a separate "part two" posting.


Sunday, July 19, 2015

Using Google Earth for Geographic Exploration (GETECH)

Readers of this blog know that I use Google Earth (GE) to plan outings and to manage data that I collect using various GPS devices. I use Google Earth as a sort of entry-level Geographic Information System (GIS) and in the following series of posts I plan to share what I've learned about using Google Earth as part of a citizen/community science data management system. I'll probably move these posts out to a separate blog in the future but to get it started I'm putting them here. If you aren't interested in these more technically oriented posts you can skip them. I''ll stick (GETECH) on the title to make them easy to recognize.

On most of my outings I collect geo-referenced data using one or more GPS devices. I have a Garmin hand-held GPS, GPS in my phone and even a camera with GPS built-in. I collect "tracks", the GPS receiver stores a point every few seconds allowing you to trace your route, and I also save WayPoints. These are specific locations of interest and the GPS saves the coordinates along with a name you enter. The Garmin GPS can grab a bunch of coordinate pairs in quick succession and average them to improve the accuracy of the fix. This is useful if you want to get the most accurate location that your device can record, usually around ten feet. I'll do a future post on GPS accuracy to explain this limitation.

After a trip I upload the data from my GPS devices into GE. This allows me to see the tracks (my route) and waypoints in the geographic context provided by GE. If the data was collected for a specific use I move it into whatever storage system I'm using for that project (more on this in a future post). My Garmin GPS is directly supported by GE so I simply plug the GPS unit into a USB port and use the GPS option on the Tools Menu. There are options to allow you select what you want to import. By default GPS data is added into a sub-folder of the "Temporary Places" folder in your GE Places. I typically tweak things a bit and move the imported data into the "MyPlaces" folder. This allows me to save each GPS data set for ready access in GE. You could also right click on your newly uploaded dataset and save it to your computer using the Save Place As option.

It's even easier to grab the GPS data using the phone. I have several GPS related apps on my Android phone (a Google Nexus 5) but I most often use GPS Essentials. As with the dedicated Garmin, GPS Essentials allows me to record tracks and save waypoints (it has other capabilities that I'll discuss in future posts). To get the data into GE I use the Export feature of GPS Essentials and save the data directly to Google Drive (Internet-based storage). It takes a few minutes but once the data shows up in Google Drive I save it to my local computer as a KML file. KML is the native file format of Google Earth and most software that uses geographically referenced data can use data in the KML format.

This has been my basic working process for several years but I've recently become concerned that it was breaking down. The data I collect is best categorized as "ecological inventory". I note where species are found, when I saw them and I record additional information about the circumstances. The "where" and "when" are essential to the data having value and I was not managing this information in a consistent way. It's there --embedded in the KML files-- but I didn't have an easy way to find everything related to a location; or everything for a specific time span. Some of data was stored in raw files and some was in databases that I've created. To maximize the value the data needs to be consolidated and I need a more robust process for recording and managing the metadata. Also, with over 200 top-level sub-folders in my MyPlaces folder, Google Earth was running noticeably slower.

Screen capture of Google Earth after I cleaned up and organized my MyPlaces data. The lines are tracks captured using GPS and the markers are points of interest.

So I looked into how GE actually manages this data and found that all of the data you see in GE in the "MyPlaces" folder is actually stored as a single file on your computer named myplaces.kml. The location of this file varies based on the operating system of your computer and the version of GE you are using. On my computer, running Windows 7 and using Google Earth Pro, the file is saved to:
C:\Users\<your-windows-name>\AppData\LocalLow\Google\GoogleEarth

Seeing the MyPlaces.kml file made it clear why GE was straining a bit. The MyPlaces.kml file on my computer was just under 50 megabytes in size and using a text editor to open it I found that it contained over 1.1 million lines. For context, if we assume that a page of text averages around 60 lines, the MyPlaces file on my computer contained over 18,000 pages. That's a bit much.

I had let the situation get out of hand and now it was going to require a lot of work to straighten it out. One approach would be use the GE user interface. In GE you can save each folder or item in the MyPlaces folder to a separate file on your computer.  You can then delete that item from MyPlaces and open the file when you want to use that data. If the item you save is a folder GE creates a single archive file with the (.KMZ extension) containing the entire contents of the folder. This approach would work but it was going to be a tedious process to say the least.

A second alternative is to edit a copy of the MyPlaces.kml file using a text editor (note that I said "edit a copy" - don't edit the file used by GE). You can use any text editor to open a KML file. Unfortunately, given the size of the file on my computer this also was going to be a slow and error prone process. Using NotePad++ --an editor design for working with lots of text-- opening and navigating the file was extremely sluggish (recall the 1.1 millions lines). I could have copied out sections and worked on pieces of the file but the data is structured (it's an XML file if you are familiar with that sort of thing) and there are references among different sections in the file. It would be very easy to mess this up.

The solution I chose was to write a script to run through the file (a copy of course) and save each folder, document and placemark to a new, separate, KML file. I could then remove (making a copy) the MyPlaces.kml file used by GE (make sure that GE is not running if you do this). The next time GE is run it creates a new and empty MyPlaces.kml file and you are back to a "clean" install of GE. The separate KML files created by the script can then be opened using GE when I need them.

I'm making this script available for anyone who wants to run it and you can access here:
https://gist.github.com/kentstanton/3441cc368d3c52621b19

Please note that you must have PowerShell 5.0 installed on your computer to run the script and you need to know how to run PowerShell scripts. If you are familiar with PowerShell programming you can alter the script as needed. And it would not be too difficult to port the code to a different language if you do not have a Windows computer to run it on. The script requires Windows PowerShell 5.0; the very latest version (as of this writing). I'm working on a larger project that will incorporate this functionality and remove this requirement but I wanted to go ahead and make this available now because it might be useful to some people as is.


Saturday, October 18, 2014

Moreau Lake - East of the Hudson -StoneWall Trail

The Hudson River splits Moreau Lake State Park (MLSP) into two sections. The main body of the park --where Moreau Lake is located-- is west of the Hudson River. However, a good sized chunk of park lies east of the river and coming from Saratoga Springs you must cross the Hudson to get there. Confusing the issue is that the Hudson makes a 90 degree turn and flows northeast through the park. So a hiker viewing the Hudson from the Palmertown Ridge is looking west toward the section of the park that is east of the river.

Moreau Lake State Park; The eastern section is on the left in this image of the park trail map.
To reach this eastern section of the park from Saratoga Springs take route 9N to Corinth. Cross the river and drive north for a half mile to the intersection with Call Street.  Turn right onto Call Street. About three miles from that intersection you'll see Hawk Road on the right (one sign says Hawk Street but it is Hawk Road). The first half mile of Hawk Road is paved but you'll quickly reach a steel gate where a sign reads; "Trailhead Parking Straight Ahead". From there it's about a mile on a one lane dirt road to the large parking area. As of October 2014 the road was passable for normal passenger cars with just a couple of rough spots.

The Stonewall trail --with Blue Markers-- leaves the west side of the parking lot (on your right as you drive into the lot). A second blue marked trail leaves the lot on the opposite northeast side. That trail is not seen on park maps that I have but it's a nice addition to the trail system. It makes possible a very pleasant loop hike of about 2.5 miles. The far point of the loop is near the Hudson at a spot where some 19th century building foundations remain. Making the "loop" is a bit confusing because, as mentioned, not all of the trails appear on the current trail maps. Even so, it's easy country to navigate and the continuation of Hawk Road (abandoned) crosses the trail at a couple of points making it possible to return to the parking area by that route.

Through the trees - the Spier Falls reservoir (Hudson River) 
This "Hawk Road Trail" (a name I just made up) also reaches the Hudson; but at a point further downstream just above the Spier Falls dam. From there the trail/road continues to the power line right-of-way leaving the power station at Spier Falls. The trail runs along the right-of-way as part of the canoe portage route around the Spier Falls dam. Canoeists approaching the dam from above leave the water and climb up to the road, follow a short stretch to Hawk Road to the right of way, and return to the water walking downhill under the power line. At that point you are on the upper section of a second reservoir backed up behind the Sherman Island dam about 3 miles further downstream. The hiking trail continues along the east bank of this reservoir for a couple more miles, but the transition between the two sections is heavily overgrown and serious tick precautions will be needed to get through unscathed.

Also worth mentioning is that this entire area is open to hunting and I ran into two hunters on my recent outing there. They politely handled their guns in a way that was safety aware but you should wear bright colors if you hike during hunting season.

As with the better known trails on the west side of the river, these trails offer a wealth of natural and human history to consider as you walk. I got a clear look at a male Red Bellied Woodpecker (Melanerpes carolinus). This species is distinctive and common in many eastern forests, but MLSP is a bit north of its' historic range. Which begs the question of whether this species is expanding its' range northward. And if so, why? Birds are able to respond to changing environmental conditions at a faster rate than many animals and plants (flying comes in real handy). So shifts in bird ranges can serve as an early indicator of changing ecological conditions. If the normal range of the Red Bellied Woodpecker is shifting northward it could be in response to a warming climate. But to make that assertion we need to know the natural history of this species for this area. Has the Red Bellied Woodpecker been present here in the past? If not, when did it arrive and what environmental/ecological changes make the area attractive now?

A less positive indicator of changing environmental conditions is seen in the extensive infestations of Asiatic Bittersweet (AB) along the section of Hawk Road that runs above Spier Falls dam. That AB is present here is hardly surprising. I had previously spotted AB from my canoe; at a place along the river/reservoir bank just below this section of trail. This area has been extensively altered by human activity and once it is present AB thrives where people disturb the forest and create forest edges. AB is common along a half mile stretch of the old road above the dam but I did not spot in the wilder forest areas. It would be interesting to survey the surrounding forest to determine the extent to which it has spread.
Asiatic Bittersweet along the (abandoned) section of Hawk Road near Spier Falls Dam.
Asiatic Bittersweet grows in dense stands that crowd out other vegetation and its' bulk can pull down trees. There is a similar native species; American Bittersweet. The two are easy to tell apart in the fall when the berries are present. If the berries grow all along a stem, it is the Asiatic variety. American Bittersweet has berries only at the ends of stems. Complicating matters is that the two varieties hybridize easily.
To round out my recent day of hiking I took a bush-whacking side excursion from the Hawk Road parking area down to the point where Bennie Brook flows into the Hudson (about 3/4 of a mile). Two things stand out from this little adventure. First, don't try to walk along the edge of the reservoir. It is really tough going and the dreaded deer (black legged) ticks --that carry Lyme disease-- are definitely present. The second point is that I did find something interesting along way; a very large White Oak, diameter 47 inches at chest height. This is probably the largest tree (by this measure) that I've seen anywhere in Moreau Lake State Park. And, because White Oaks are long lived, it could be the oldest as well. White Oaks can live to be 300+ years old and I'd love to know if this tree is really old, having somehow escaped logging, fires and other mishaps. Or is it a younger tree, maybe in the 150 year range, that just happened to grow under particularly favorable conditions. So many questions so little time.