Sunday, October 11, 2015

Santanoni Preserve - Newcomb Lake to Moose Pond

By the time I finished my hike to Moose Pond I had, according to my GPS, covered over 17 miles. That's a long walk, but it's not as difficult as it might sound because much of the way was over trails that follow what were once well-built woods roads. That makes for relatively fast and easy walking. It also didn't hurt that it was a nearly perfect day for hiking; early fall, cool, and mosquito free. I walked the Newcomb Lake road to the Moose Pond crossover trail. Then over the crossover trial to the Moose Pond Horse trail and out the Moose Pond trail to the pond. I returned following the Moose Pond trail back to the Newcomb Lake road and out.

The route as recorded by my GPS and viewed in Google Earth. That's Newcomb lake on the right and Moose Pond at the upper left.


The highlight of the route is the five mile trail that connects the Newcomb Lake road with the Moose Pond Horse Trail. The Newcomb Lake road is the five mile long gravel road leading to Camp Santanoni on Newcomb Lake. This area is managed by DEC as a historical site and the road (closed to public vehicle traffic) is a great walk in its' own right. The road also delineates a section of the High Peaks Wilderness boundary so, when you leave the road (after four miles) you immediately enter the High Peaks Wilderness. The five mile long trail that connects the road with the Moose Pond Horse trail is a beautiful and invigorating walk.

Fall in the Adirondacks. Even the swamps look good.

The first section of the connecting trail stays south of Newcomb Lake until you reach the unnamed inlet stream at the west end of the lake. This stream flows through an extensive wetland which is crossed without difficulty over a solid bridge and then a long split-log boardwalk.

Bridge over the inlet stream.

The boardwalk crossing the Newcomb Lake Inlet. 
Just past the end of the boardwalk you reach a trail junction. Turning right the trail leads along the north shore of the lake and loops back to the great camp area and the road. The trail to Moose Pond turns left (west) and enters a spruce/cedar forest.

For someone interested in forest communities, and succession in forest communities, this section of the trail is fascinating. The terrain is flat, and wet, and the forest mix is typical for that type of terrain; dominated by Spruce and Balsam Fir. The interesting part is that the Spruce here are larger than is commonly seen. Probably not virgin timber large, but old second-growth large. Added into the mix are large Cedars that appear to be quite old. On a clear fall morning this section of trail felt like a trip back through time.


Large cedars are mixed in with Spruce, Balsam Fir and other tree species.

And this trail is little used. From the bridge the trail stays close to the stream for a mile or so and this section of trail is overgrown with some blowdown to work over and around. There are a few places where if it weren't for the trail markers you might have to search around a bit to find the path.

Eventually the route gains enough elevation that you enter a mixed hardwood forest. This section of the route covers roughly two miles before joining up with the Moose Pond Horse Trail. It's not a particularly interesting section and much of the route follows what I took to be old logging roads. The larger trees are Sugar Maple and Yellow Birch so there may have been selective logging in this area. None of the trees are particularly large and my guess is that logging took place here 50-75 years ago.

A highlight of this section is the beaver pond/swamp/meadow that you reach about half way between Newcomb Lake and the Moose Pond trail. It's an attractive spot and from the beaver dam you get an interesting view of a sharp little pinnacle on a ridge of Moose Mountain.

Fall in the Adirondacks.

Past the beaver pond the trail trends to the northwest as it contours around a couple low ridges. About a half mile before the junction with the Moose Pond trail the route veers to the south, travels in that direction for a couple hundred yards, turns west, and then back to the north.. Much of the crossover trail is faint, but at this point the route-finding becomes a significant challenge.


I knew that the Moose Pond trail was a quarter mile away to the west and I could have simply headed in that direction until I hit it. That option was unattractive, however, because a swampy wetland lies between the two trails. That quarter mile would have undoubtedly been wet and muddy so finding the path was still the best bet.

Reaching a place where I could no longer pick up any hint of a path I suspected that the trail had been re-routed and that I missed a detour. So I doubled back to see if I had missed a turn. I back-tracked for over a quarter mile and, if there was a detour, I couldn't find it. In any case, continuing on where I thought the trail should be, I soon spotted a trail marker and an arrow sign nailed to a tree. From there it was just a couple hundred yards to the junction with the Moose Pond trail. If you go this way you should be comfortable finding your way through the woods.

There it is! Back on the trail.

It's hard to keep up the pace when hiking on a day such as this. Every turn of the trail brings another photo opportunity.

From the junction it's 1.3 miles to Moose Pond with a decent little hill in between. Given the the round trip from the junction to the lake would add 2.5 miles to an already long day, I thought about just turning towards home. But I'm glad that I didn't. The view across Moose Pond to Santanoni Mountain, and its' prominent slide, was a delight. And, the forest around the pond is older. Most of the old trees are hardwoods with some large Maple and Yellow Birch present. But, best of all, close to the edge of the pond I spotted a White Pine in that rare category of "trees with diameter over 48 inches". Trees of that size are rare in the Adirondacks today.

Moose Pond with Santanoni Peak in the background. The slide is well know to residents of the Long Lake/Newcomb area. You see it as you drive east towards Newcomb on Rte. 28N.


Saturday, October 3, 2015

Whitehouse to Canary Pond; Quiet and Remote

The last time I stood on the suspension bridge that carries the Northville Lake-Placid Trail over the West Branch of the Sacandaga at Whitehouse I was around 10 years old. That was close to 50 years ago.

Image 1: Bridge over the Sacandaga West Branch. The bridge crosses over a rock outcrop in the center of the river (now covered with trees). The total length of the two spans is close to 300 feet. 
That visit took place during a family camping trip to the State Campground on the Sacandaga River just south of Wells. My family was one of a half dozen families who regularly camped together at various campgrounds around the State. My childhood was punctuated by those trips. If I remember correctly, on this particular outing, a couple of the Dads decided to take a bunch of the kids on a hike. The bridge at Whitehouse was new at that time and a 300 foot long suspension bridge over a major river was well worth a look; especially since several of the Dads worked for what was then called the New York State Conservation Department. I don't actually remember the bridge but I know we stood on it because there's a family photo to prove it. What I do recall is that we hiked to a place where a USGS benchmark was set into a boulder alongside the trail. There is a benchmark noted on current maps about a mile north of the bridge on the NLPT so we probably went that way.

On my more recent visit (September, 2015) I did cross the bridge. I was headed for Canary Pond and I thought I might try to go the extra couple of miles to reach Silver Lake from the north. But I turned back at Canary Pond and the nearly 14 mile round trip was plenty of hiking for one day. It took me nine hours to walk that route and a big reason for that was that it was an absolutely gorgeous early fall day with the leaves just starting to turn. I took lots of picture and that takes time.

Image 2: West Branch Sacandaga looking south from the bridge at Whitehouse. 
The human history of the area is described in fascinating detail by Bill Ingersoll in Discover the Southern Adirondacks. As Ingersoll notes, the first settlers to the area arrived in the 1850s and over the roughly 100 year period between settlement and acquisition by the State the land served many uses. The first settlers may have attempted to farm the land but the long winters and thin soil would have discouraged that idea, and from 1900 onward a succession of hotels, hunting lodges and finally a boys summer camp occupied the site. The surrounding wilderness has been owned by the state going back to the late 19th century and the 350 acres where the bridge is now located were acquired in 1962.

The hike south to Canary Pond passes through a rapidly maturing 2nd growth hardwood forest. The Silver Lake Wilderness lies in what was once part of the great northern hardwood forests that covered most of New York State. Sugar Maple, Yellow Birch, and American Beech were the dominant tree species and, today, stands of Birch and Maples are rapidly approaching maturity. The Beech are mostly gone; killed off by Beech Bark Disease. This route passes through forests where many trees are approaching 36 inches in diameter with a few larger ones mixed in. There are also stands of Hemlock and I measured one Hemlock on the slope leading up to Mud Pond Notch at 47 inches in diameter.

One of the more interesting sights along the way to Canary Pond was the beaver dam on a small stream between Mud Pond and Canary Pond. This dam is (or was) an engineering marvel. On the day I hiked the route (Sept. 27, 2015), it was very dry; northern New York State had received below average moisture for the year and August and September were notably dry. The beaver had managed to completely block the stream and the outflow below the dam amounted to barely a trickle. As seen in images 3 through 6, the beaver pond was quite large -over 6 acres as measured in Google Earth- and water was backed up to the very top of the dam. Unfortunately for the beaver shortly after my visit the area would receive between three and four inches of rain in a 24 hour period. I have to wonder if the dam stood up to that deluge.

Image 3: Beaver Dam along the trail between Mud Pond and Canary Pond

Image 4: The pond the beaver build.

Image 5: Looking up at the dam from the stream bed. The water in the foreground was standing water in the stream bed. Almost no water was getting through the dam.

Image 6: Looking back across the pond from the far side. The dam,, and the vantage point for the three pictures, is in the farthest distant corner of this shot. On the far shore left of the beaver house. 

I'd be interested to know if the the dam stood up to the heavy rain but I'm sure the beaver will manage, they have been damming this stream for centuries if not longer. Using our ability to view historical imagery in Google Earth we can see that over just the past 15 years the pond pictured above has filled and drained several times. The sequence of images that follows comes from Google Earth showing imagery from 2013, 2011, 2009, and 2006. From this we see that the current large pond was created since the date of the most recent satellite imagery for this area dated from August 2013.

The yellow lines in image seven are the tracks capture by my GPS. There are two lines because one is the track on the way to Canary Pond and the other is the track from my return trip. As you can see, the lines don't overlap, and the difference averages around 30 feet. I keep promising to write more about GPS accuracy, and explain why the tracks differ by that amount, so maybe I'll get around to that soon.

Image 7: The beaver pond/meadow as seen in Google Earth imagery from August 2013.

Image 8: The beaver pond/meadow as seen in Google Earth Imagery from May 2011. You might also wonder why this image is "fuzzy" when compared with the one from 2013. The most recent round of imagery used in Google Earth (as seen in image 7) is at a higher resolution than was previously available.

Image 9: The beaver pond as seen in imagery from May 2009. The beaver had dammed the stream and filled the pond.

Image 10: The beaver pond/meadow as seen in Google Earth Imagery from June 2006. The dam was out and the pond was a grass-filled meadow.
I did eventually make it to Canary Pond, a lovely and remote body of water (Image 11). Along the way you pass Mud Pond, site of a lean-to that is in particularly good shape. Ingersoll says that the appreciation of Mud Pond requires a special aesthetic (images 12 and 13) and for tired through hikers on the NLPT the difficulty of getting to the pond to get water probably does lead to a bit of cursing. But I thought it was pretty enough and marshes look to me like an exceptionally good place for bird watching. By the way, the stream that Ingersoll mentions as a source of water for campers staying at the leanto, was completely dry on the day I was there.

Image 11: Canary Pond

Image 12: Mud Pond
Image 13: The path over the outlet of Mud Pond. A split log bridge passes through and should keep feet dry most of the time.

Image 14: Fall foliage along the Sacandaga West Branch.

Saturday, September 12, 2015

Five Ponds Wilderness - The High Falls Loop

The people of the State of New York claim ownership but make no mistake, the Five Ponds Wilderness is the kingdom of the Beaver. That's what makes Five Ponds so great. It's real wilderness: wet, muddy, buggy, overgrown and generally inconvenient.

I recently (Sept 2015) hiked the route known as the "High Falls Loop". With a couple of short side jaunts that hike covered 17.1 miles; very close to my limit for hiking miles in one day. There are challenges, and the general messiness that defines the place, but Five Ponds is also an uncommonly flat area. The elevation differential between Cranberry Lake and High Falls is just 100 feet and the area's defining feature, the Oswegatchie River, follows a meandering path through a broad valley. Long stretches of the trail follow a track originally built to support a logging railroad and that solid base makes for fast and easy walking.

High Falls Loop showing my GPS track (blue). The complete loop includes a half mile of road walking between the two trail heads near the village of Wanakena. The yellow line shows the trail south to the five small ponds after which this area is named. The gray lines show the routes of historic trails abandoned following the 1995 storm that caused extensive blowdown throughout this area. (Image capture from Google Earth)


The Five Ponds Wilderness is all about the water. There are lakes, ponds, streams and the Oswegatchie River. Then there are swamps, bogs, and marshes of every size, shape and variety. And if that's not enough there are Beaver ponds at every possible stage of succession. 

A wet meadow. The Five Ponds area is noted for its' open meadows including the large open area known as "the plains." The plains is classified by the New York Natural Heritage project as a boreal heath barrens; an uncommon ecological community type. The area pictured is a wet meadow just north of the plains. 

High Falls on the Oswegatchie River. This is the falls at a time of very low water. August and early September 2015 have been unusually dry.

I started the day heading south on the High Falls Loop East Trail. This popular trail connects Wanakena with Janacks Landing on Cranberry Lake and it provides access to various trails and destinations in the northeastern quadrant of the Five Ponds Wilderness. It is also the shortest formal trail to High Falls. The route covers 6.1 miles to a trail junction where you follow a half mile side trail to the falls. A sign near the falls reads "Wanakena 9 Miles". That's the distance if you return by continuing around the loop on the west side trail. Which is what I did. The two trailheads are less than a half mile apart on South Shore Road in the Hamlet of Wanakena so the loop hike is easy to manage without the need for two cars.

The Oswegatchie River from High Rock
As mentioned, a good part of the route follows a grade originally built to support a railway. The rail lines were laid just after the turn of the 19th century by the Rich Lumber Company to enable timber harvesting on the 16,000 acres the company owned south of Wanakena. I haven't seen references to exactly when the rails were removed but the state acquired the land in 1916 and it's likely that the company took the rails with them when they departed. By that time the forest had been heavily logged and intense fires had swept the area. Much of the High Falls Loop trail passes through a second growth forest that is roughly 100 old. After the state took ownership of the land the railway grade was converted to a truck trail. That woods road was abandoned when the Five Ponds Wilderness was created and and the route became the west side trail.

Along with the falls, a highlight of the trip is the unique ecological area known as "The Plains"; a large open area that was present before the logging started. The Plains is classified by the New York State Natural Heritage project as a Boreal Heath Barrens.


Looking into the "plains" from the south. An uncommon combination of environmental and ecological factors has apparently kept this area from being reclaimed by forest. At least at the rate that might be expected,. However, it seems likely that over a longer period the trees will recolonize much of the area and the plains will fade into the surrounding forest.


As mentioned, much of the route is on a relatively smooth and level trail that makes for fast walking.
But there is one recurring challenge. The route has recently been flooded --or currently is flooded-- by beaver activity at more that a dozen locations. The wetter terrain lies mostly in the southern half of the route but the one place where I was not able to avoid wet feet is less than a half mile from where the west side trail joins the road in Wanakena. The trail crosses over a slightly raised causeway between a swampy area and a made-made pond and Beaver have damned the culvert that allows a small stream to flow through. The result being that the causeway itself was completely flooded (Image 4). Short of backtracking and bushwhacking around the entire mess there was no way to avoid walking through the water. Given that I had already walked over sixteen miles, and that I was ready to be done hiking, I just plowed on through. Had I started the loop on this trail the story would have been different. Getting wet feet at the start of a long day presents a significant problem. Looking back I realized how many places I had just barely made it through while staying dry. If you hike this route expect to do some wading and plan accordingly.


It looks like you could stay dry by walking in the grass on either side so you'll have to take my word for it; there was no way through this section without getting wet feet. A man-made pond is just out of the photo on the right and the water visible in the trail is the edge of pond backed up by the Beaver. That water is coming in from the left and the grass there stands in several inches of water.

One of the many places where the path crosses a beaver dam.

One of the reasons I really wanted to hike this route was to finally get a first-hand look at the havoc wrought by the infamous Derecho storm of 1995. That storm, on July 15th 1995, caused extensive blowdown throughout the Adirondacks and the forests of the Five Ponds Wilderness were particularly hard hit. Just over 20 years have passed since the storm and evidence of the event is starting to fade. The route passes through several areas where nearly every large tree was knocked down; evidenced by the lack of large trees and by the tangle of large decaying logs lying everywhere. Equally striking is the bright sunlight that reaches the forest floor in these places. Areas where the canopy was knocked down are now filled with saplings of the pioneer tree species that fill in whenever an opening appears in the forest.

Following the 1995 storm trail crews cut through hundreds of downed trees to reopen the trails.

The trail crosses a mud hole on this log. The log sways a bit and you need to be sure footed. It was dry on this day but this crossing could be quite daunting when it is wet.

That 1995 storm figures in my family history as well. The storm passed through just after sunrise on a Saturday and we were planning on attending a family reunion in Long Lake on Sunday. We live in Saratoga Springs and we experienced the storm as a notably severe thunderstorm. During the day on Saturday we heard reports that the storm had been much more severe in the mountains and that several campers had been killed by falling trees. Driving up on Sunday morning we could hardly help but notice the many trees down along the roads but, it was not until we got to Long Lake, and heard my Dad's story that the uniqueness of the event came into focus. Dad was then a member of a hunting and fishing club that leased the area around Rock Pond (south of Little Tupper Lake, now part of the Whitney Wilderness). He had arrived at the cabin the club maintained near the pond on Friday and planned to drive out to Long Lake on Sunday morning to attend the reunion. Shortly after the storm passed it became clear to him that that was not going to happen. The cabin where he was staying, and, his pickup parked nearby, were both unharmed, but several miles of woods roads lay between him and pavement and large downed trees lay across the entire route. I don't recall exactly what he did on that Saturday but probably got into his canoe and went fishing thinking that other club members (some of whom are also members of our family) would eventually arrive.

Instead, the silence of Sunday morning was broken by a float plane coming in for a landing on Rock Pond. Another club member had flown in to make sure he was OK and he hitched a ride back to Long Lake by plane. Hearing his tale of experiencing the storm in the forest was harrowing enough but the human tragedy was brought home when we reached the Lake Eaton campground for the reunion. A camper trailer crushed down to the axles sat forlornly in the parking area.. No one was killed at Lake Eaton but a camper did die at Lake Lila; a place where we have camped several times.

Following the storm much dismay was expressed over the loss of old-growth timber in the Five Ponds region; many large, old, trees were toppled. But storms like this have blown through the Adirondacks many times before and will continue to do so in the future. From the perspective of a human lifetime this is significant forest event and, for a few families, a deep tragedy. But in 100 years direct evidence of the event will have vanished and unless we do something really stupid the forests will go on. And the beaver won't care.

Adirondack Life: Lowdown on the Blowdown


Tuesday, September 1, 2015

USGS Historical Maps Via Topoview

In the days before Google Earth (and similar) one of my favorite pastimes was to pour over printed maps. And my favorite maps were the large scale topographic maps produced by the the USGS, the United States Geological Survey. Back in the day we actually went to a store and bought the maps we needed and a collection of large-scale maps covering the Adirondacks was a non-trivial investment.

Going back to the mid-90s the USGS has also provided digital access to maps from its' vast library. That access has evolved considerably over the last 20 years culminating in the recently unveiled Internet application called TopoView. TopoView provides public access to (nearly) the entire library of historical topographic maps created by the agency over the past 135 years; over 170,000 map sheets from different editions (year and scale). If you want to dive right in the link goes to the TopoView home page where you'll find a short video that explains how to use the application. Or just go straight to the application and start poking around. The TopoView interface is well designed and well executed. Best of all, it's fun to use; at least I think so.

A screen capture of the TopoView interface. The box in the lower left provides details map sheets available for the selected grid cell. Clicking the map image in the box opens a high resolution image of the map. Links in the box allow maps to be downloaded in several different formats.  
TopoView is a remarkable application and, for the Adirondacks, it provides a unquie source of historical data. The Adirondack region has undergone two great transformations over the last 200 years. The first was the destruction of vast swaths of virgin forest by logging and fire starting around 1850 and lasting into the early 20th century. The second transformation has proceeded more slowly but is well underway. It is the regeneration and succession of the Adirondack forests following the  protections put in place starting in the 1890s. The maps available via TopoView provide a timeline and geographic snapshot of  that second transformation.

Let's look at some maps that illustrate what I'm talking about. The four maps that follow are:
  • 1898 - USGS 1:62500-scale Quadrangle for Thirteenth Lake. The map is overlaid with two current hydrologic data sets (also available from the USGS). The red lines represent streams and rivers and the dark blue areas are represent water bodies (lake and ponds).
  • 1954 - USGS 1:62500-scale Quadrangle for Thirteenth Lake, NY - with hydro overlays
  • 1954 - USGS 1:62500-scale Quadrangle for Thirteenth Lake, NY - water boundary overlay is not shown to make it easier to see the representation on the topographic map
  • 1997 - USGS 1:25000-scale Quadrangle for Bakers Mills, NY - a higher resolution recent map

Map 1: 1898 - USGS 1:62500-scale Quadrangle for Thirteenth Lake. The map is overlaid with current hydrological data. The red lines are streams and rivers. The dark blue areas represent water bodies (lake and ponds). The mis-alignment between this 120 year old topographic map and the modern GIS layer is clearly visible. But this map was made in the days before aerial surveys and it met the accuracy standards of the day. Quite remarkable actually, this is not easy country to move around in.

Map 2: 1954 - USGS 1:62500-scale Quadrangle for Thirteenth Lake, NY - with overlays. The modern boundary layer for the Mud Ponds aligns closely with the outlines shown on the topographic map.

Map 3: 1954 - USGS 1:62500-scale Quadrangle for Thirteenth Lake, NY - water boundary overlay not shown. Note the addition of the trail that reaches the ponds.

Map 4: 1997 - USGS 1:25000-scale Quadrangle for Bakers Mills, NY - a higher resolution recent map with water boundary and stream overlays. The current hydrological overlays align closely with the topographic map. 

I download the topographic maps using the TopoView application and loaded them into qGIS (Quantum GIS, open source GIS) so I could add the high resolution water layers that provide an up-to-date geographic context. Map one, from a USGS map printed in 1898, shows an approximation of the size, shape and location of the two ponds (Mud Ponds, in the Siamese Lakes Wilderness). But that's not to say that the map did not meet the accuracy standards of that time. Given the survey methods available then the map was very likely up to standards and accurate enough. If you wanted to visit these ponds that map could serve as your guide. While it is ultimately true for all data, geographic data is always an imperfect and approximate representation of the real world. It's easy to forget that when reading a well produced map from a trusted source. USGS topographic maps are produced to meet an accuracy standard that defines acceptable levels for accuracy and errors. You can learn more about this here.

Map two shows the same water layers overlaid on the USGS map from 1954 and, as you can see, the alignment between the USGS map and the modern water layers is significantly better. This map also shows a trail. That trail was not shown on earlier coverages of the area. Map three is the same configuration but with the display of water boundaries turned off. This makes it easier to see the ponds as they are represented on the topographic map.

Map four was made using the current base map from 1997. The newest map is higher resolution with a scale of 1:24,000. The earlier maps represented a scale of 1:62,500. The alignment of the water layers with the latest topographic map is very good. An interesting side point is that the trail visible in the 1954 map is no longer present on the map. See my post on a recent hike to these ponds to learn more about why this point was important to me.

The maps I downloaded from TopoView to create the above images were retrieved in the GeoTiff format. That format provides the highest quality option for maps retrieved from TopoView. The KML option is nearly as good and works best with Google Earth. The GeoPDF format is best if you want to print a copy of a map that you download. And the JPG option is good for viewing maps directly on your computer, especially in a web browser.

In upcoming posts I'll discuss additional opportunities and issues associated with this incredible source of historical geographic data.


Monday, August 31, 2015

Shanty Brook and Mud Ponds

Nestled into the southeastern corner of the Siamese Ponds Wilderness are two bodies of water called the "Mud Ponds". My 1994 ADK guidebook (Central Region) calls these two remote ponds "jewels in the forest" and the book notes that the ponds were probably named by guides who wanted to deter visitors to favored fishing ponds. That deception is no longer necessary. These ponds are not easy to get to.

The route to the Mud Ponds follows an old path into the Siamese Ponds Wilderness and that path, as described in the ADK guide, is well on its' way to being fully reclaimed by the forest. The route has not seen any trail maintenance in decades and whatever hiker traffic it does receive is barely enough to keep the way open. Past the first couple of miles constant attention is required to avoid losing the path and the last mile to the ponds has deteriorated to the point where it should be approached as straight up bushwhacking.

As mentioned, the trail to Mud Ponds via Shanty Brook is described in the 1994 edition of the ADK Guide to Adirondack Trails - Central Region trail guide. Using TopoView to look at USGS topographic maps of the area I see that the trail all the way to the ponds is not shown on large scale (1:24,000) topographic maps from the 1990s but it does appear on the 1994 edtion of the 1:100,000 Raquette Lake map. The first appearance of the trail is on the 1957 edition of the 1:62,500 Thirteen Lake map. So the trail first appears on a USGS map in 1957 and it is gone from maps published after 1994. But that does not mean that the trail had faded from all current maps. The trail does appear on a current edition of the Trails Illustrated Northville/Raquette Lake map. That map was apparently sourced from the earlier ADK map that came with the ADK guidebook (it replicates minor errors present on that map). Looking at a new and nicely printed map it's easy to make assumptions about the accuracy of the information. Maps, like all documents, fall out of date and sometimes even the best maps are just wrong. Something to keep in mind.    

The route overlaid on a recent USGS topographic map (Bakers Mills, 1997, 1:24000). The red line shows the route I followed and the purple line shows the route I would follow if I went back to try again. This map no longer shows a trail from the brook crossing to the ponds and to reach Mud Ponds you'll need to bushwhack that last mile. 
The first challenge in visiting Mud Ponds is finding the trailhead. If you take Route 8 from Wells the parking area is on the right about ten miles from the place where routes 30 and 8 split. It's a large paved pull off with two entrances so you can't miss it. Except that it looks like an abandoned rest stop and there are no signs. The ADK guide says that you should park in this lot and walk up Rte 8 for a couple hundred yards to a dirt road that leaves the highway on the river side. You certainly can do that, but you can also park on the dirt road itself. There are several primitive campsites and plenty of room for cars to be parked alongside the road.

From the entrance to the dirt road you need go only 30 yards before an obvious path down the steep bank is seen. The guidebook states that two cables were stretched over the river at that point but no cables are present. If you look closely, however, you'll spot a tree with clear marks where a cable previously cut into the bark. When the water is low the river can easily be waded at that point and the trail is clearly visible entering the woods on the far side. Alternatively, if you work your way upstream for 75 yards you'll come to a spot where you can have a go at rock hopping across. You'll need to be nimble to get across with dry feet. And those missing cables? They are lying in a tangle a few feet into the woods on the far side.

The trail is pretty good as far as the first vlei. It's about as remote a spot as you'll find anywhere for a walk of less than two miles.
The first stretch of trail is easily followed but narrow. Just push your way through the trees and shrubs that are rapidly filling in the corridor. You won't go far before you'll encounter the first of the dozens (scores? hundreds?) of downed trees that cross the path. Repeat after me, "over, under or go around; over, under or go around." This is a decision you'll make many times on this route. After a quarter mile the trail comes along side Shanty Brook and opens up a bit. At .6 miles you'll come to an obvious path leaving the main trail on the right (east side). The trail and the brook are separated at this point but you should be able to hear falling water. The side path leads a short distance to an overlook above the first of a series of falls and cascades on Shanty Brook. This falls is quite impressive with a 15 foot vertical drop into a rock walled chasm. The falls is well worth a look and a worthy destination in its' own right. But take care; the side path comes rather abruptly to to a vertical drop near the top of the falls. 

Falls on Shanty Brook. Looking down from the top.

The route beyond the falls continues to be easy to follow and at about 1.3 miles the path crosses Shanty Brook. Crossing the brook could be difficult in times of high water but few will actually face that challenge. If crossing the brook will be difficult then crossing the Sacandaga East Branch will be a much more significant challenge. 

At just under two miles you reach a large open vlei. This a pretty spot and it too could stand as a worthy destination. Past the vlei the path generally stays close to Shanty Brook as it meanders through a valley where many generations of beaver have dammed the stream. The path through this stretch remains generally easy to follow and in places where it fades a bit of searching should get you back on track. Someone has tied orange marker tapes to tree branches in a few places; perhaps to help them find their way back.

Looking across the first vlei towards the Blue Hills.


Past the first vlei the route stays close to the edge of Shanty brook. Recent beaver activity has backed up the stream in several places flooding the banks. Yes, that is the path disappearing into the muck. This is one of many places where you'll need to work around an obstacle and then try to pick up the path again on the other side. 

If you are aiming to visit the Mud Ponds you'll reach the critical juncture about 2.7 miles from the start. I didn't realize it at the time but when you reach the place where the path passes close to a solid looking beaver dam (at the lower end of another large vlei) you have reached the turning point. I continued northwest following a faint trail along the east side of the vlei. After a few minutes of walking, however, all traces of the trail faded away. This, along with the fact that I was bearing due north --not the expected direction-- led to the realization that this could not be the correct way. I knew that the route to Mud Ponds makes a 90 degree turn from northwest to southwest about 2.7 miles from the trailhead and I had clearly gone too far. Making my way back to the previously mentioned beaver dam it dawned on me that the beaver had flooded the place where the path crossed the brook and turned to the southwest. Crossing the brook below the dam I searched along the west edge of the vlei until I found a faint path emerging from the pond. That path looked promising but it soon reentered an area flooded by past beaver activity and was lost.

According to my map it's just over a mile from the turning point to the outlet of the upper pond (the point between the two ponds). I worked my way through the tangled forest mostly within sight of the stream/mud flats/vlei/beaver ponds for over an hour to reach a point where I could just see the lower pond through the trees. This route passes through a young second growth forest with a particularly dense (and annoying) understory. Looking towards the ponds all I could see was more tangled and swampy terrain so I called it a day and turned around. Whatever path once existed has been fully reclaimed by the forest and I make that statement with confidence because I expended considerable energy searching up and down the slopes trying to pick the up the path (with the hope of easier going). And you can find faint remnants of a path. There are several places where a distinct footpath can be found and followed. But in each case the trail is soon lost in tangles of blow down or where beaver activity has flooded the way. So, despite what you might see on a map, there is no trail from the stream crossing to the Mud Ponds.

I may go back some day and the knowledge of what to expect will make it much easier to reach the ponds. I'll probably climb up the slope of Blue Hills Mountain a short ways and head straight for the outlet of the upper pond. Contouring around the shoulder of the mountain will add some climbing but it will reduce the distance and it will (hopefully) avoid the worst of the tangles.  Treat this section of the route as pure bushwhacking and pick the path of least resistance. Attempting to follow the old trail requires extra effort for no significant benefit.

Sunday, August 9, 2015

The Pine Orchard: You Know When You Are In It

The Pine Orchard is a well known stand of old growth White Pine and Hemlock near Wells (NY). If you read this blog you know that I'm always on the look out for the big old trees, so a visit to the Orchard was long overdue. I'd read that the Pine Orchard contains trees up to seven feet in diameter but, I have to admit, I was skeptical. I wondered if trees, like fish, get bigger with each telling of the tale. I was prepared to be underwhelmed by the Pine Orchard. Happily, I was wrong. The Pine Orchard is impressive and these may very well be the largest and oldest trees in the southern Adirondacks.

But how big --exactly-- are the pines in the Pine Orchard? I measured a few trees and the largest one I found has a diameter of 51 inches; just over four feet. I took this measurement by stretching a cord around the tree four and a half feet above the ground. The distance on the cord measured 161 inches and dividing that by 3.14 yields the diameter: 51 inches. That's not the six to seven feet that some have reported but I might not have measured the very largest trees. And while measuring the diameter at four and half feet is standard practice in forestry circles, others might have done it differently.

I'm interested in the history of the Adirondack forests and the large old trees have stories to tell. So I look for them when I hike. Over the past several years whenever I've spotted a large tree I've noted the location and estimated the size. Now that I've refined my measurement technique I see that my past estimates may have tended towards the high side (No, Dad, this does not apply to fish I've caught in the past). I carry an old ski pole as a walking stick and I've used the pole as a gauge for estimating tree diameters. I now see that this technique is insufficiently precise. In the Adirondacks, trees with diameters of 36-40 inches are found in many places. Trees of that size will typically be more than 125 years old and a stand containing many trees of that size may have been passed over, or selectively logged, in the first wave of industrial logging. That first wave took place after 1850 and continued into the early part of the 20th century. You can also find trees with diameters larger than 40 inches scattered about in the Adirondacks, but these are much less common. These trees were almost certainly standing before 1850. The really big and old trees, with diameters of 44 inches or larger, are rare. The Pine Orchard contains a number of trees in the 44-48 inch range and estimates that I've seen place the age of the stand at over 200 years. (Note: the correlation between tree size and age varies with species and growing conditions).

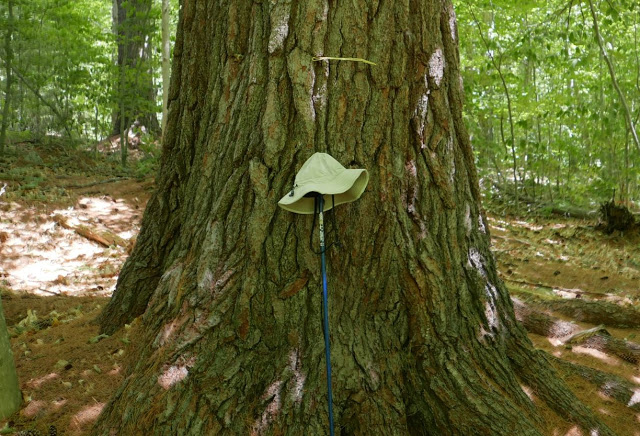
Image One: A large White Pine near the point where you first reach the Pine Orchard Stand. The strand of yellow yarn is one foot in length.

The Pine Orchard: Old Growth Forest


The Pine Orchard is old growth. At 200 years without external disturbance the forest has reached the climax stage in terms of ecological succession. For this location, and given whatever circumstances protected it originally, that means mature White Pine with some Hemlock and a few old hardwoods mixed in. Stands of old growth pine are often compared to a cathedral and that description applies to the Pine Orchard. The forest floor is blanketed with a deep layer of pine needles that absorbs sound and this is an airy, quiet, place. I was there on a very warm day and it was pleasantly cool under the cover of the large trees.


Image Two: The cathedral in the pines. The forest floor is covered with a two century accumulation of pine needles. Smaller trees are mixed in but the canopy is dominated by the large White Pines.

The Trail and the Hike


The route I followed leaves the Pumpkin Hollow road at the Murphy Lake trailhead. As with the the trail to Wilcox Lake this route is marked and maintained as a snowmobile trail. The 1994 ADK guide to Trails of the Southern Region described this trail as indistinct and hard to follow. That Guide advised that this route should be attempted only by hikers skilled with map and compass and it went so far as to say that the trail was not recommended for parties of fewer than three people. 
Image Three: From Google Earth. The entire route covering 5.9 miles each way.

That guide was written over 20 years ago and much has changed. I don't know whether the warning was justified when the book was written, but it is not true today. The route generally follows old woods roads and it for pleasant walking. There are a couple places where arrows (signs) point the way. Not because the trail is indistinct but because multiple old woods roads intersect and it could be difficult to pick the correct route. Interestingly, the warning from the ADK guide was carried over to a much newer map. My favorite trail maps these days are the "Trails Illustrated" Topographic Maps produced by the National Geographic Society. The Northville/Raquette Lake map covers the southeastern Adirondacks and that map restates the warning about parties of "at least three persons" word-for-word.

There is also a meaningful discrepancy in the length of this route as stated on signs and as printed in various guides. As measured using GPS my hike covered a total of 11.8 miles. This included a bit of wandering around so the sign board at the road which states the distance to the Pine Orchard as 5.6 Miles is reasonably accurate. The 1994 ADK Guide lists the distance at 6.6 miles one way. And a third distance, derived by adding up distances seen on signs along the way, yields a total of 4.2 miles. Applied to the round trip, the difference between the shortest and longest mileage is over four miles. That's a serious lack of accuracy.

There are two apparent sources for the uncertainty. The first is that there is no distinct point or boundary to mark your arrival at the Pine Orchard. The lack of a clear "here it is" location accounts for a tenth mile or two of the discrepancy. This is a question of precision. Lacking a distinct end-point it's difficult to measure the distance to the tenth of a mile precision typically used on trail signs. The second consideration is that over the past 30-40 years the trail has been re-routed, probably more than once. The 1994 ADK Guide alludes to this noting that the trailhead had been moved to avoid a crossing of private land. This is also evident in an old sign seen at the junction with the Flatters trail. The sign says that it is 2.6 miles to the "Willis Lake Road" but the trail doesn't go to the Willis Lake Road. That was probably the original starting point. If the sign stated the distance as "a few miles" it would be more accurate but not very precise. As it sits, it is neither.   

Image Four: Stanton Miles: When our children were young we would take them hiking and the first thing they wanted to know was; "how far is it?" To which I would respond "a couple of miles." It took only a few outings for them to realize that my "couple of miles" could be anything from two to five miles. That answer is accurate but not very precise and my scale became known in the family as "Stanton Miles." If you use Stanton Miles the difference between what appears on the sign and the actual distance of four miles is accounted for.

Uncertainty, Accuracy and Precision


Measuring the diameter of a tree is pretty easy. And collecting measurements from many trees is a straightforward process:
  • Measure the tree
  • Record the location
  • Record the species
  • Note unusual or complicating factors
  • Repeat
That sounds easy enough, and it is easy. Which is why I am continually surprised by all the different ways that uncertainty creeps into the data. Part of it comes from doing this work in the Adirondack Biting Insect Preserve. During the warm months you encounter many many small complications and distractions and for the rest of the year your fingers will be numb making it difficult to write out notes. But sometimes I run into more specific issues:
  • Diameter: What about double-trunk trees? Or trees in difficult locations? What if there is a branch or some other oddity at the 4.5 foot height where I want to measure?
  • Location: Assuming that the accuracy level of your GPS device is good enough, and assuming that you have a good signal from several satellites, and assuming that you correctly note which location goes with which tree, it nothing more than the push of a button.
  • Species: I'm familiar with most tree species seen in the Adirondacks, especially the species that get to be big. Still, when I have gone back and looked at the same trees a second time I've found that I get some of the them wrong.
  • Notes: Some days I do a good job of recording the unusual or complicating factors and some days not so good. And this information often turns out to be important when trying to draw conclusions from a body of data.
On one point I have no doubt. All non-trival data contains errors and considerations of precision and accuracy are relative to the intended use. These are the sources of uncertainty.

A Couple of Miles: I was just being accurate


As often happens, the use of a tool under less than ideal conditions leads to a deeper understanding how the tool works. Using GPS to record locations and to record the tracks I've follow has given me a deeper understanding of how the system works. I'm going to return to this topic in the future but a few key points go right along with the theme of this post. First, take a look at image five. The lines show a short section of the track captured by my GPS receiver on the hike to the Pine Orchard and back. The line on the left was from the inbound leg of the trip and the line on the right is from the return trip. I walked the same path both ways so it's odd that the the lines are so far apart. To get to the bottom of this you need to know something about how I hike.

I took much longer to complete the trip to the Pine Orchard then I did on the return and this is typical for me. And this was not because of the terrain. The route crosses a couple of small ridges but there is very little difference between the elevation at the turn around point. It's counter intuitive, but I typically travel at a slower pace on the way in because I'm fresher. On the way in I stop to record measurements, I take photos and I generally take more time to enjoy the forest the scenery. On a hike of this distance by the time I'm half way back to the car I'm starting to get tired. And this is the counter-intuitive part, I tend to walk faster and I move along without stopping. On this particular day, it was hot and by the time I reached the area shown in image five I'd been hiking for over five hours. It was also into the early afternoon and I was I not hiking alone. I was traveling with dozens of new (and now really annoying) friends that I'd made along the way. Deer flies, midges, mosquitoes and a few too-stupid-to-just-give-up-and-die black flies. The bug spray that had been mostly effective earlier in the day was no longer working. 

Image Five: GPS Accuracy 
The lines in the image show a short segment of the track captured by my GPS receiver on the hike to the Pine Orchard and back. The line on the left was from the inbound leg of the trip and the line on the right is from the return trip. I was walking on the same path for both legs of the journey, so you might expect the lines to be very close to each other. (Map Image from Google Earth)

A GPS track like the one shown in the image is recorded as a series of points. Every second or so (this will vary based on the device) the GPS receiver calculates your location and stores the coordinate pair representing that location.  When you stop the receiver gets extra time to correct for errors so stopping periodically improves the accuracy of the track overall. This is especially true when walking through a dense forest where the strength of the signals is reduced by foliage. In image five I added a note to a place where it looks like I took a short side trip off the trail. But I know that that never happened. What did happen is that the GPS recorded a couple of points with much lower accuracy and those points became part of my route. If I was planning to use this track as data I would need a method to clean up these kinds of errors. 

There are many factors that limit the best case accuracy of GPS. A GPS receiver captures signals sent by satellites orbiting the earth and when the receiver has signals from at least three of these satellites it can calculate your location. The U.S. GPS system uses a constellation of 32 satellites positioned so that there should always be at least three satellites above the horizon and "visible" to a GPS receiver located anywhere on the earth. Under good conditions a typical consumer GPS receiver can fix your location to within about 10 yards -30 feet- using signals from three satellites (four are required to also calculate your elevation). At that accuracy level you use the coordinates calculated by the receiver and place a point on a map. Then you draw a circle with a diameter of 30 feet around the point. Your actual location lies somewhere in that circle. 

Depending on what you are trying to do that may or may not be accurate enough and it's usually possible to get much more accurate data. For instance, it's common for there to be more than the minimum of three satellites available to your receiver. Modern GPS receivers including the ones found in most smart phones, use the "extra" satellites to average out some of the errors that otherwise limit GPS accuracy. For example, when I save a waypoint (the coordinates for a single location) using my Garmin GPS it tells me how accurate the fix will be based on the set of satellites available to it. The use of additional satellites and averaging commonly improves accuracy into the ten to twenty foot range. On the other hand, dense foliage, cliffs, mountains and other obstructions reduce accuracy or prevent the receiver from getting any fix at all.

The point is that data taken from measurements is always uncertain to some degree and the level of uncertainty varies based on the specifics of how you gather the data and your intended use. You have to ensure that your data is accurate enough for the intended use and you have to avoid mis-representation by overstating the level of precision. When I use a cord to measure the circumference of a tree, if my measurement is accurate to within one inch then I can state the diameter in inches. Dividing the circumference by Pi to get the diameter will almost always yield an answer with a remainder, something like 45.3. But the .3 must be thrown away. The accuracy level of my measurement does not support that level of precision. If a trail sign states a distance as 2.6 miles, then assuming typical rounding to the nearest tenth we can say that it's accurate if the actual distance is between 2.55 and 2.65 miles. Assuming, of course, that it's the correct sign for the trail you are on. My GPS gives me coordinates with 6 decimal places of precision. That's precise enough to separate locations that are just inches apart. But the device is not nearly that accurate and the last digit (and maybe the last two) should be discarded. The extra precision is meaningless at best and misleading at worst. Whenever we take measurements there is uncertainty and the level of precision we use should not overstate the accuracy of our technique. 

You see kids, when I said it was a "couple miles" I was giving you the most accurate answer that I could.