Sunday, August 9, 2015

The Pine Orchard: You Know When You Are In It

The Pine Orchard is a well known stand of old growth White Pine and Hemlock near Wells (NY). If you read this blog you know that I'm always on the look out for the big old trees, so a visit to the Orchard was long overdue. I'd read that the Pine Orchard contains trees up to seven feet in diameter but, I have to admit, I was skeptical. I wondered if trees, like fish, get bigger with each telling of the tale. I was prepared to be underwhelmed by the Pine Orchard. Happily, I was wrong. The Pine Orchard is impressive and these may very well be the largest and oldest trees in the southern Adirondacks.

But how big --exactly-- are the pines in the Pine Orchard? I measured a few trees and the largest one I found has a diameter of 51 inches; just over four feet. I took this measurement by stretching a cord around the tree four and a half feet above the ground. The distance on the cord measured 161 inches and dividing that by 3.14 yields the diameter: 51 inches. That's not the six to seven feet that some have reported but I might not have measured the very largest trees. And while measuring the diameter at four and half feet is standard practice in forestry circles, others might have done it differently.

I'm interested in the history of the Adirondack forests and the large old trees have stories to tell. So I look for them when I hike. Over the past several years whenever I've spotted a large tree I've noted the location and estimated the size. Now that I've refined my measurement technique I see that my past estimates may have tended towards the high side (No, Dad, this does not apply to fish I've caught in the past). I carry an old ski pole as a walking stick and I've used the pole as a gauge for estimating tree diameters. I now see that this technique is insufficiently precise. In the Adirondacks, trees with diameters of 36-40 inches are found in many places. Trees of that size will typically be more than 125 years old and a stand containing many trees of that size may have been passed over, or selectively logged, in the first wave of industrial logging. That first wave took place after 1850 and continued into the early part of the 20th century. You can also find trees with diameters larger than 40 inches scattered about in the Adirondacks, but these are much less common. These trees were almost certainly standing before 1850. The really big and old trees, with diameters of 44 inches or larger, are rare. The Pine Orchard contains a number of trees in the 44-48 inch range and estimates that I've seen place the age of the stand at over 200 years. (Note: the correlation between tree size and age varies with species and growing conditions).

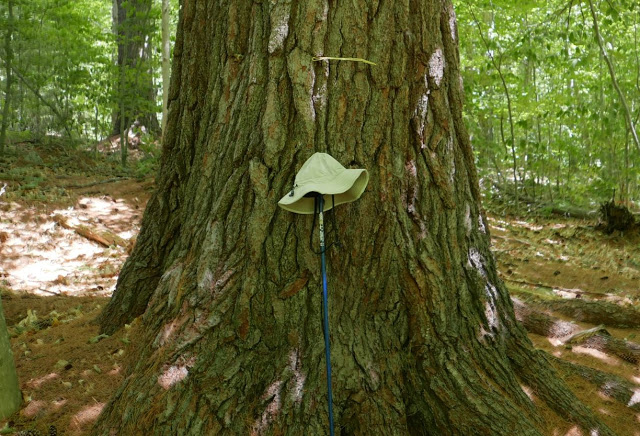
Image One: A large White Pine near the point where you first reach the Pine Orchard Stand. The strand of yellow yarn is one foot in length.

The Pine Orchard: Old Growth Forest


The Pine Orchard is old growth. At 200 years without external disturbance the forest has reached the climax stage in terms of ecological succession. For this location, and given whatever circumstances protected it originally, that means mature White Pine with some Hemlock and a few old hardwoods mixed in. Stands of old growth pine are often compared to a cathedral and that description applies to the Pine Orchard. The forest floor is blanketed with a deep layer of pine needles that absorbs sound and this is an airy, quiet, place. I was there on a very warm day and it was pleasantly cool under the cover of the large trees.


Image Two: The cathedral in the pines. The forest floor is covered with a two century accumulation of pine needles. Smaller trees are mixed in but the canopy is dominated by the large White Pines.

The Trail and the Hike


The route I followed leaves the Pumpkin Hollow road at the Murphy Lake trailhead. As with the the trail to Wilcox Lake this route is marked and maintained as a snowmobile trail. The 1994 ADK guide to Trails of the Southern Region described this trail as indistinct and hard to follow. That Guide advised that this route should be attempted only by hikers skilled with map and compass and it went so far as to say that the trail was not recommended for parties of fewer than three people. 
Image Three: From Google Earth. The entire route covering 5.9 miles each way.

That guide was written over 20 years ago and much has changed. I don't know whether the warning was justified when the book was written, but it is not true today. The route generally follows old woods roads and it for pleasant walking. There are a couple places where arrows (signs) point the way. Not because the trail is indistinct but because multiple old woods roads intersect and it could be difficult to pick the correct route. Interestingly, the warning from the ADK guide was carried over to a much newer map. My favorite trail maps these days are the "Trails Illustrated" Topographic Maps produced by the National Geographic Society. The Northville/Raquette Lake map covers the southeastern Adirondacks and that map restates the warning about parties of "at least three persons" word-for-word.

There is also a meaningful discrepancy in the length of this route as stated on signs and as printed in various guides. As measured using GPS my hike covered a total of 11.8 miles. This included a bit of wandering around so the sign board at the road which states the distance to the Pine Orchard as 5.6 Miles is reasonably accurate. The 1994 ADK Guide lists the distance at 6.6 miles one way. And a third distance, derived by adding up distances seen on signs along the way, yields a total of 4.2 miles. Applied to the round trip, the difference between the shortest and longest mileage is over four miles. That's a serious lack of accuracy.

There are two apparent sources for the uncertainty. The first is that there is no distinct point or boundary to mark your arrival at the Pine Orchard. The lack of a clear "here it is" location accounts for a tenth mile or two of the discrepancy. This is a question of precision. Lacking a distinct end-point it's difficult to measure the distance to the tenth of a mile precision typically used on trail signs. The second consideration is that over the past 30-40 years the trail has been re-routed, probably more than once. The 1994 ADK Guide alludes to this noting that the trailhead had been moved to avoid a crossing of private land. This is also evident in an old sign seen at the junction with the Flatters trail. The sign says that it is 2.6 miles to the "Willis Lake Road" but the trail doesn't go to the Willis Lake Road. That was probably the original starting point. If the sign stated the distance as "a few miles" it would be more accurate but not very precise. As it sits, it is neither.   

Image Four: Stanton Miles: When our children were young we would take them hiking and the first thing they wanted to know was; "how far is it?" To which I would respond "a couple of miles." It took only a few outings for them to realize that my "couple of miles" could be anything from two to five miles. That answer is accurate but not very precise and my scale became known in the family as "Stanton Miles." If you use Stanton Miles the difference between what appears on the sign and the actual distance of four miles is accounted for.

Uncertainty, Accuracy and Precision


Measuring the diameter of a tree is pretty easy. And collecting measurements from many trees is a straightforward process:
  • Measure the tree
  • Record the location
  • Record the species
  • Note unusual or complicating factors
  • Repeat
That sounds easy enough, and it is easy. Which is why I am continually surprised by all the different ways that uncertainty creeps into the data. Part of it comes from doing this work in the Adirondack Biting Insect Preserve. During the warm months you encounter many many small complications and distractions and for the rest of the year your fingers will be numb making it difficult to write out notes. But sometimes I run into more specific issues:
  • Diameter: What about double-trunk trees? Or trees in difficult locations? What if there is a branch or some other oddity at the 4.5 foot height where I want to measure?
  • Location: Assuming that the accuracy level of your GPS device is good enough, and assuming that you have a good signal from several satellites, and assuming that you correctly note which location goes with which tree, it nothing more than the push of a button.
  • Species: I'm familiar with most tree species seen in the Adirondacks, especially the species that get to be big. Still, when I have gone back and looked at the same trees a second time I've found that I get some of the them wrong.
  • Notes: Some days I do a good job of recording the unusual or complicating factors and some days not so good. And this information often turns out to be important when trying to draw conclusions from a body of data.
On one point I have no doubt. All non-trival data contains errors and considerations of precision and accuracy are relative to the intended use. These are the sources of uncertainty.

A Couple of Miles: I was just being accurate


As often happens, the use of a tool under less than ideal conditions leads to a deeper understanding how the tool works. Using GPS to record locations and to record the tracks I've follow has given me a deeper understanding of how the system works. I'm going to return to this topic in the future but a few key points go right along with the theme of this post. First, take a look at image five. The lines show a short section of the track captured by my GPS receiver on the hike to the Pine Orchard and back. The line on the left was from the inbound leg of the trip and the line on the right is from the return trip. I walked the same path both ways so it's odd that the the lines are so far apart. To get to the bottom of this you need to know something about how I hike.

I took much longer to complete the trip to the Pine Orchard then I did on the return and this is typical for me. And this was not because of the terrain. The route crosses a couple of small ridges but there is very little difference between the elevation at the turn around point. It's counter intuitive, but I typically travel at a slower pace on the way in because I'm fresher. On the way in I stop to record measurements, I take photos and I generally take more time to enjoy the forest the scenery. On a hike of this distance by the time I'm half way back to the car I'm starting to get tired. And this is the counter-intuitive part, I tend to walk faster and I move along without stopping. On this particular day, it was hot and by the time I reached the area shown in image five I'd been hiking for over five hours. It was also into the early afternoon and I was I not hiking alone. I was traveling with dozens of new (and now really annoying) friends that I'd made along the way. Deer flies, midges, mosquitoes and a few too-stupid-to-just-give-up-and-die black flies. The bug spray that had been mostly effective earlier in the day was no longer working. 

Image Five: GPS Accuracy 
The lines in the image show a short segment of the track captured by my GPS receiver on the hike to the Pine Orchard and back. The line on the left was from the inbound leg of the trip and the line on the right is from the return trip. I was walking on the same path for both legs of the journey, so you might expect the lines to be very close to each other. (Map Image from Google Earth)

A GPS track like the one shown in the image is recorded as a series of points. Every second or so (this will vary based on the device) the GPS receiver calculates your location and stores the coordinate pair representing that location.  When you stop the receiver gets extra time to correct for errors so stopping periodically improves the accuracy of the track overall. This is especially true when walking through a dense forest where the strength of the signals is reduced by foliage. In image five I added a note to a place where it looks like I took a short side trip off the trail. But I know that that never happened. What did happen is that the GPS recorded a couple of points with much lower accuracy and those points became part of my route. If I was planning to use this track as data I would need a method to clean up these kinds of errors. 

There are many factors that limit the best case accuracy of GPS. A GPS receiver captures signals sent by satellites orbiting the earth and when the receiver has signals from at least three of these satellites it can calculate your location. The U.S. GPS system uses a constellation of 32 satellites positioned so that there should always be at least three satellites above the horizon and "visible" to a GPS receiver located anywhere on the earth. Under good conditions a typical consumer GPS receiver can fix your location to within about 10 yards -30 feet- using signals from three satellites (four are required to also calculate your elevation). At that accuracy level you use the coordinates calculated by the receiver and place a point on a map. Then you draw a circle with a diameter of 30 feet around the point. Your actual location lies somewhere in that circle. 

Depending on what you are trying to do that may or may not be accurate enough and it's usually possible to get much more accurate data. For instance, it's common for there to be more than the minimum of three satellites available to your receiver. Modern GPS receivers including the ones found in most smart phones, use the "extra" satellites to average out some of the errors that otherwise limit GPS accuracy. For example, when I save a waypoint (the coordinates for a single location) using my Garmin GPS it tells me how accurate the fix will be based on the set of satellites available to it. The use of additional satellites and averaging commonly improves accuracy into the ten to twenty foot range. On the other hand, dense foliage, cliffs, mountains and other obstructions reduce accuracy or prevent the receiver from getting any fix at all.

The point is that data taken from measurements is always uncertain to some degree and the level of uncertainty varies based on the specifics of how you gather the data and your intended use. You have to ensure that your data is accurate enough for the intended use and you have to avoid mis-representation by overstating the level of precision. When I use a cord to measure the circumference of a tree, if my measurement is accurate to within one inch then I can state the diameter in inches. Dividing the circumference by Pi to get the diameter will almost always yield an answer with a remainder, something like 45.3. But the .3 must be thrown away. The accuracy level of my measurement does not support that level of precision. If a trail sign states a distance as 2.6 miles, then assuming typical rounding to the nearest tenth we can say that it's accurate if the actual distance is between 2.55 and 2.65 miles. Assuming, of course, that it's the correct sign for the trail you are on. My GPS gives me coordinates with 6 decimal places of precision. That's precise enough to separate locations that are just inches apart. But the device is not nearly that accurate and the last digit (and maybe the last two) should be discarded. The extra precision is meaningless at best and misleading at worst. Whenever we take measurements there is uncertainty and the level of precision we use should not overstate the accuracy of our technique. 

You see kids, when I said it was a "couple miles" I was giving you the most accurate answer that I could. 


Friday, July 31, 2015

Wilcox Lake via Pumpkin Hollow


By the late 19th century the area north of Great Sacandaga Lake was dotted with hamlets and farms. Most of those homesteads are now gone -reclaimed by the forest-- but some of the forest roads that once connected them remain in use as trails. The Pumpkin Hollow trail to Wilcox Lake follows one of those routes.

Image One: From the Stony Creek USGS Historical Topographic map. 1:62500, 1910 Edition. The route to Wilcox Lake follows an old woods road from Willis Lake (on the left) to Wilcox Lake (top right).  


The 1994 ADK Guide to Trails of the Southern Region makes four observations about the Pumpkin Hollow trail to Wilcox lake:
  1. The trail passes through an attractive and maturing second growth forest.
  2. With the exception of eroded areas around Wilcox Lake the trail is in excellent condition.
  3. Parking at the end of the Pumpkin Hollow road is iffy. Good parking can be found at the Murphy Lake trail head but that option adds 1.5 miles (each way) to the route.
  4. There might not be a bridge over the Wilcox Lake outlet and crossing the stream in times of high water can be difficult.
As of July 2015 three of those four considerations remain true. This is a wonderful hiking route through an exceptionally attractive forest. The area around Wilcox lake does show scars from past motor vehicle access but the damage is fading. The choice on where to park remains the same but the bridge is not a problem. There is a good bridge over the outlet stream.

As part of the Forest Preserve the area around Wilcox Lake is classified as Wild Forest; a designation that allows for uses that are prohibited in wilderness areas and the Pumpkin Hollow trail is maintained (and marked) as a snowmobile trail. The ADK Guide notes that in past times vehicles reaching Wilcox lake from the Bakertown area caused extensive erosion on the hillside leading down to the lake. But I saw no sign of recent vehicle use and the eroded areas are recovering.

Image Two: Large Sugar Maple along the trail


The Trail and the Forest


The Pumpkin Hollow trail passes through an impressive, maturing, second-growth forest. With so many large trees present it appears that this area somehow escaped logging and fire reaching back into the 19th century. The forest contains a mix of species including Sugar Maple, Ash, White Pine, Hemlock, Birch and Beech.

Image Three: It's difficult to capture the 'feel' of a forest in an image (I'll have to work on this) but this is a rapidly maturing northern hardwood forest. For scale, the large tree on the right has a diameter of around 30 inches. This area contains trees that must be more than 150 years old. 


I found this forest to be particularly appealing because it looks like what I expect an undisturbed northern hardwood forest to look like. The presence of large trees of multiple species creates a dense canopy that limits the amount of light reaching the forest floor and that results in a relatively open forest understory. You can also see an open understory where stands of large Hemlock and White Pine are present but a mature hardwood forest has a different feel. When a large hardwood comes down it creates a big opening in the canopy and a variety of tree and shrubs species rush to take advantage of that. Over time these openings appear in a random pattern and you end up with a patchwork of open forest and dense little thickets. That is what I expect a climax stage northern hardwood forest to look like. Some areas along this trail have that appearance.

Particularly interesting is the presence of American Beech trees that have survived the initial kill-off caused by Beech Bark Disease (BBD). One Beech, with a diameter over 30 inches, may be the largest standing Beech I've seen since I started looking for them. Image Four shows this tree and while it looks pretty healthy my photo captured the tree's "good side". The back side of the tree shows extensive signs of BBD. One unfortunate aspect of BBD is that relatively healthy looking trees oftentimes fall victim to Beech Snap (Image Five). This happens because the disease weakens the trunk of the tree. So large trees with heavy canopies become vulnerable to breaking off in heavy weather. Beech snap is characterized by standing Beech trunks broken off cleanly 8 to 20 feet above the ground. Once you know what to look for you'll start to see these "snapped" Beech trees where ever mature Beeches were formerly present.

The large tree pictured in Image Four got me thinking about an intriguing possibility. This is the second large Beech I've seen that bears the unmistakable scar of a lightening strike. Could it be that a lightening strike kills the fungus (or the insects that spread it) giving the tree a better chance of fighting off BBD? If it takes being hit by lightening to survive then clearly it is not easy to be a Beech tree.

Image Four: A Large American Beech

Image Five: Beech Snap. Large Beech trees that appear to be holding their own against BBD can fall victim to Beech Snap. This occurs when a weakened tree is unable to support the weight of  its' canopy and the trunk snaps.


The Pumpkin Hollow trail also passes through an area where very large and old White Pines are seen. A number of trees with diameters greater than 36 inches are present and a few are approaching 48 inches. Trees of that size must be more than 150 years old and could be more than 200 years old. This got me thinking about the well-known Pine Orchard located just five miles north of the Pumpkin Hollow Pine stand. I've not yet visited the Pine Orchard but it would be interesting to compare measurements of trees from both areas. If the measurements show that the two sets of trees got going at about the same time it might shed some light on the history of this forest.

Wilcox Lake

Despite concerns about vehicle access and erosion Wilcox Lake is an attractive and worthwhile destination. As mentioned, eroded areas near the lake are starting to heal and the shoreline is in good shape. According to current maps there are two lean-tos at Wilcox Lake though that could change. The one that I visited is in bad shape and could topple over at any time. 

Image Six: Wilcox Lake

Image Seven: The eastern lean-to at Wilcox lake. It looks like the bottom tier of logs from this lean-to rotted out and that layer of logs was somehow removed. The current structure is not connected to the floor and the walls are leaning precariously. It looks like it could fall down at any moment.

Parking


Image Eight: You can park at the Murphy Lake Trail head on Pumpkin Hollow Road (far left) or you can drive past Willis lake and try to make your way to the small parking area found where the red and blue lines meet on the map.
You have a choice to make when deciding where to park. There are signs and good parking at the Murphy Lake trail head on Pumpkin Hollow Road. As seen on the map (Image eight) this parking area is at the far left where the red line begins. If you start hiking at that point you'll walk the road past Willis Lake and up a couple of hills. After a mile and a quarter you'll come to a couple of camps on the left. Just past the second camp the road narrows and gets much rougher. From there it's another 1/4 mile to a small parking area and the DEC barrier at the start of the trail part of the Wilcox Lake trail (roughly 5.5 miles to Wilcox Lake from there).

Or, you can drive that same route. From Willis Lake to the camps the road is in pretty good shape but there's no clearly safe place to park along that section. Once you pass the camps the road is not at all car friendly and the last hundred yards or so before the parking area is extremely rough. I inched my Subaru Forester toward the parking area and found a decent place to pull off just at the point where I couldn't go any further. Which was good because backing out was going to be very difficult.


Friday, July 24, 2015

Google Earth and KML - Part Two (GETECH)

In the previous post I introduced the topic of working with geographic data in the KML format. As mentioned there, KML is the native data format used by Google Earth (GE) and it is widely supported by both GPS devices and software. I won't attempt to cover all the gory details of working with and editing KML in this series of posts (resource links at the end), but there a few practical things I've learned about working with GPS data in the KML format that I want to share.

As a basis for this discussion I'm looking at two GPS tracks I recorded on a short Kayak trip on the Kayaderosseras Creek near Saratoga Springs. One was recorded using my trusty Garmin GPS and the other was recorded using the GPS receiver in my camera; a Canon Sx260. I'll discuss and compare the accuracy of the two tracks and touch on some other issues you might encounter while using GPS to collect geo-referenced data for use in your projects.

The first issue is evident in the screen shot below (Image 1). The red line represents the track captured by the GPS receiver in the camera. The purple line shows the route recorded by the Garmin. The obvious difference is that the purple line extends beyond the point where the red line stops. That's because the red line stops at the place where I put the kayak into the creek and later took it out (at the Spa State Park Canoe Launch Site on Driscoll Road). I paddled upstream for a mile or so and then floated back down. I had both GPS units turned on and both units recorded the path. The purple line continues because when I got back to the launch point I forgot to turn off the Garmin GPS. So it recorded a track for the short carry from the creek up to the parking area and for my drive home. That data is not useful so the first thing I want to do is remove it.

Image 1: Screen capture from Google Earth. The two lines (red and purple) are GPS tracks recorded simultaneously on Kayak trip on the Kayaderosseras Creek near Saratoga Springs (NY)

I could do that by editing the track directly in Google Earth. That would be easy but it would be extremely tedious. There are several mouse clicks required to delete a point and there are a lot of points to get rid of to clean up this problem. You can see this in image two. For this screen capture I turned off the display of the track recorded by the camera (the red line) and selected the purple track for editing This makes visible the points recorded by the GPS. Each recorded point is represented by a red dot in the image and as you can see, there are a lot of points in just this short section of the route from the creek to my house. To remove this part of the track by editing it in GE you'd click on each points, select Delete, confirm the deletion and repeat. Lots of repeats.

Image 2: Screen capture from Google Earth. With the display of the track recorded by the camera (the red line) off, the track represented by the purple line was selected for editing. This allows us to see the individual points recorded by the GPS receiver. 
A better alternative is to open the KML file containing the track in a text editor and remove the unwanted points from the file. Once you have the hang of it you can edit the data in the file very quickly. There are few steps involved in this process which goes something like this:
  1. Export the track to a file. In Google Earth right click on the item in the Places pane, select Save Place As. Be sure to select KML from the format drop down so the file is saved in the KML format.
  2. Open the file in a text editor or an XML editor (I use Notepad++; a free and open source editor that is popular with programmers). You may need to configure your editor to recognize that the KML file is an XML file. That should allow the editor display the contents with nice formatting.
  3. In this case, removing the points I don't want comes down to removing all the points where the latitude is greater than the latitude of the put-in point. I'm in the northern hemisphere --so the latitude coordinates increase as you go north-- and all the points I want to keep are south of the put-in. Image three shows the map zoomed in on that location with the properties dialog for the point displayed. The properties dialog shows the latitude and longitude of the marker (and the location). This is how I got the latitude I will use as the basis for my edits; any point with a latitude greater than 43.034293 can be removed from the file. A potential complication is that that the coordinates in the KML file are stored using the decimal degree format. That's as you see it in the dialog seen in image three, but that representation is not the default for coordinates in Google Earth. The default is to represent coordinates in the Degree/Minute/Second format; like this: 43°02'03.4548" You can change the representation used by Google Earth using the Options dialog on the Tools menu.


Image 3: Screen capture from Google Earth. Viewing the properties of a marker added at the location of the start/end point of the trip. The properties dialog shows the coordinates of that point.

Once you have a KML file containing your track, and you have a way to identify the point(s) to remove (in this case, latitude > 43.034293) you can remove the unwanted points from the file. To do this you do need to know a little bit about the XML data format and how to edit data stored in XML, but there are many introductions to XML available on-line and I've included references at the end of this post. Also, if you've done any work with HTML this will all look familiar. XML data elements are placed inside of tag pairs and you must delete the entire tag pair or you wil break the formatting of the file (and GE will complain when you try to reload it). You'll also need to recognize how the coordinates are represented. An example from my file looks like this:

<gx:coord>-73.79277999999999 43.034036 102.52</gx:coord>

The coordinate of the location is represented by three values with a space placed between each value (it might be hard to see the space; -73.79277999999999<space>43.034036<space>102.52). The values are:

-73.79277999999999longitudea "west" longitude represented as a negative number
43.034336latitudea "north" latitude represented as a positive number
102.52elevationmeters above sea level

As discussed in the previous section, I want to delete any point where the latitude is greater than 43.034293, so this point can be removed from the file. The points are stored in the file in order, so once you find the place break between what you want and what you want to remove you can select all the bad rows and remove them. If editing data in this way is familiar to you then this should get you started. If this is entirely new then you may need more help. Look at the references or ask a friend who knows about this stuff.

With unwanted data removed from your file there is one final step; opening the file in Google Earth so you can see the results of your work. In Google Earth select "Open" from the File menu and find your edited file on disk. If you get warnings about errors check the file over for mis-matched tag pairs. That's it, you can save the file in your Places folder so that Google Earth reopens it automatically or you can reopen the file when you need it in the future.

This post is already rather long so I'm going to cover the other topics I raised at the start in a separate "part two" posting.


Sunday, July 19, 2015

Using Google Earth for Geographic Exploration (GETECH)

Readers of this blog know that I use Google Earth (GE) to plan outings and to manage data that I collect using various GPS devices. I use Google Earth as a sort of entry-level Geographic Information System (GIS) and in the following series of posts I plan to share what I've learned about using Google Earth as part of a citizen/community science data management system. I'll probably move these posts out to a separate blog in the future but to get it started I'm putting them here. If you aren't interested in these more technically oriented posts you can skip them. I''ll stick (GETECH) on the title to make them easy to recognize.

On most of my outings I collect geo-referenced data using one or more GPS devices. I have a Garmin hand-held GPS, GPS in my phone and even a camera with GPS built-in. I collect "tracks", the GPS receiver stores a point every few seconds allowing you to trace your route, and I also save WayPoints. These are specific locations of interest and the GPS saves the coordinates along with a name you enter. The Garmin GPS can grab a bunch of coordinate pairs in quick succession and average them to improve the accuracy of the fix. This is useful if you want to get the most accurate location that your device can record, usually around ten feet. I'll do a future post on GPS accuracy to explain this limitation.

After a trip I upload the data from my GPS devices into GE. This allows me to see the tracks (my route) and waypoints in the geographic context provided by GE. If the data was collected for a specific use I move it into whatever storage system I'm using for that project (more on this in a future post). My Garmin GPS is directly supported by GE so I simply plug the GPS unit into a USB port and use the GPS option on the Tools Menu. There are options to allow you select what you want to import. By default GPS data is added into a sub-folder of the "Temporary Places" folder in your GE Places. I typically tweak things a bit and move the imported data into the "MyPlaces" folder. This allows me to save each GPS data set for ready access in GE. You could also right click on your newly uploaded dataset and save it to your computer using the Save Place As option.

It's even easier to grab the GPS data using the phone. I have several GPS related apps on my Android phone (a Google Nexus 5) but I most often use GPS Essentials. As with the dedicated Garmin, GPS Essentials allows me to record tracks and save waypoints (it has other capabilities that I'll discuss in future posts). To get the data into GE I use the Export feature of GPS Essentials and save the data directly to Google Drive (Internet-based storage). It takes a few minutes but once the data shows up in Google Drive I save it to my local computer as a KML file. KML is the native file format of Google Earth and most software that uses geographically referenced data can use data in the KML format.

This has been my basic working process for several years but I've recently become concerned that it was breaking down. The data I collect is best categorized as "ecological inventory". I note where species are found, when I saw them and I record additional information about the circumstances. The "where" and "when" are essential to the data having value and I was not managing this information in a consistent way. It's there --embedded in the KML files-- but I didn't have an easy way to find everything related to a location; or everything for a specific time span. Some of data was stored in raw files and some was in databases that I've created. To maximize the value the data needs to be consolidated and I need a more robust process for recording and managing the metadata. Also, with over 200 top-level sub-folders in my MyPlaces folder, Google Earth was running noticeably slower.

Screen capture of Google Earth after I cleaned up and organized my MyPlaces data. The lines are tracks captured using GPS and the markers are points of interest.

So I looked into how GE actually manages this data and found that all of the data you see in GE in the "MyPlaces" folder is actually stored as a single file on your computer named myplaces.kml. The location of this file varies based on the operating system of your computer and the version of GE you are using. On my computer, running Windows 7 and using Google Earth Pro, the file is saved to:
C:\Users\<your-windows-name>\AppData\LocalLow\Google\GoogleEarth

Seeing the MyPlaces.kml file made it clear why GE was straining a bit. The MyPlaces.kml file on my computer was just under 50 megabytes in size and using a text editor to open it I found that it contained over 1.1 million lines. For context, if we assume that a page of text averages around 60 lines, the MyPlaces file on my computer contained over 18,000 pages. That's a bit much.

I had let the situation get out of hand and now it was going to require a lot of work to straighten it out. One approach would be use the GE user interface. In GE you can save each folder or item in the MyPlaces folder to a separate file on your computer.  You can then delete that item from MyPlaces and open the file when you want to use that data. If the item you save is a folder GE creates a single archive file with the (.KMZ extension) containing the entire contents of the folder. This approach would work but it was going to be a tedious process to say the least.

A second alternative is to edit a copy of the MyPlaces.kml file using a text editor (note that I said "edit a copy" - don't edit the file used by GE). You can use any text editor to open a KML file. Unfortunately, given the size of the file on my computer this also was going to be a slow and error prone process. Using NotePad++ --an editor design for working with lots of text-- opening and navigating the file was extremely sluggish (recall the 1.1 millions lines). I could have copied out sections and worked on pieces of the file but the data is structured (it's an XML file if you are familiar with that sort of thing) and there are references among different sections in the file. It would be very easy to mess this up.

The solution I chose was to write a script to run through the file (a copy of course) and save each folder, document and placemark to a new, separate, KML file. I could then remove (making a copy) the MyPlaces.kml file used by GE (make sure that GE is not running if you do this). The next time GE is run it creates a new and empty MyPlaces.kml file and you are back to a "clean" install of GE. The separate KML files created by the script can then be opened using GE when I need them.

I'm making this script available for anyone who wants to run it and you can access here:
https://gist.github.com/kentstanton/3441cc368d3c52621b19

Please note that you must have PowerShell 5.0 installed on your computer to run the script and you need to know how to run PowerShell scripts. If you are familiar with PowerShell programming you can alter the script as needed. And it would not be too difficult to port the code to a different language if you do not have a Windows computer to run it on. The script requires Windows PowerShell 5.0; the very latest version (as of this writing). I'm working on a larger project that will incorporate this functionality and remove this requirement but I wanted to go ahead and make this available now because it might be useful to some people as is.


Wednesday, July 8, 2015

Round Lake: Enter the Boreal Core

The Adirondack Atlas refers to it as the 'boreal core'. No hard boundaries define this region and you'd be hard pressed to name the characteristics that make it distinct. The presence of boreal species and assemblages is certainly part of it, but it's also weather patterns and the glacial landscape dotted with lakes, streams and swamps. Lots and lots of swamps. For me it's the just feel of the place. Traveling west out of Long Lake you enter a landscape that feels different from areas to the east and south. The eastern Adirondacks can lay claim to the scenery but the core has the wildness.

Recent additions to the Forest Preserve make it easier than ever to enjoy that wildness. From the Adirondack Hotel in Long Lake it's barely 20 minutes to the first canoe put-in for the William C. Whitney/Round Lake Wilderness. There is a ranger station and canoe put-in for Little Tupper Lake at the old Whitney Industries Headquarters (with lots of parking) but you can also put your canoe in the water right along the road where you first come to Little Tupper Lake (there is good parking). From there you can head downstream following the flow into Round Lake or cross under the bridge into Little Tupper. From our base in Long Lake Elle and I were able to take advantage of this easy access on successive days over the long 4th of July weekend.

Round Lake is a large lake; 750 acres, but it is overshadowed by its' even larger neighbors; Little Tupper and Lake Lila. Perhaps this is why we saw only a smattering of people over the course of our two visits. Or maybe it was the black flies and mosquitoes. There's no shortage of either of those species.

The great boreal forests of Canada reach a southern limit in the Adirondacks. Vast amounts of water and long cold winters are necessary to produce the conditions in which boreal species thrive.
One of the small islands on Round Lake. Like the others, this island is wind swept and fragile.

Pitcher Plants in one of the many bogs and swamps that ring the lake.

The lake is home to multiple pairs of loons. We also spotted a Bald Eagle soaring overhead, a Cooper's Hawk (most likely ID) Cedar Waxwings and other common Adirondack species.  

What we used to call a Kodachrome moment.

I think this is Pickerelweed (Pontederia cordata).

Whatcha lookin at?
Dragon Flies are apparently attracted to pink. We know for sure that Black Flies are. Ellie's sweater seemed to collect them like a magnet.

You can just make out the dam on the outlet of Round Lake outlet. Click the picture to see the full size image. The dam comes in from the right (I'll try to get a better picture next time). The concrete dam is apparently just remnant of the original structure. My Dad worked on Whitney Park in the late 50s and early 60s and he tells me that at that time there were mechanisms to control the water level and a second wooden dam designed by Bert Stanton (my great uncle). The wooden dam is gone, and the concrete is eroding, but the remaining structure still raises the water level of Round Lake and of Little Tupper Lake. Looks like it raises the water level by only a couple of feet but, given the size of these two lakes, that's still a lot of water.

The Round Lake dam in an image captured from Google Earth. This view from downstream shows the remnant dam clearly coming into the flow from the left and you can see that the dam has been breached (intentionally???). The block of concrete seen in this image is the same one that you just make out in my photo (above). This image is from May of 2013 (according to the Google Earth metadata) at a time when the water level was well below the top of the concrete. My photo from July 6, 2015 was taken following a month of heavy rains and the water level in Round Lake was just an inch or so below the top of the concrete dam; a couple of feet higher than when this satellite image was made. That fits with what we had seen elsewhere on the lake. We already knew that Round Lake was just an inch or two below the high water marks visible on exposed rocks.  

Another image of the dam from Google Earth. 


Saturday, July 4, 2015

Burnt Mountain; Bushwhacking to an Interesting Summit Near Long Lake

As with Fishing Brook Mountain, Burnt Mountain is visible from Route 28n just east of Long Lake. It's a small peak --just 2600 feet-- and it would go mostly unnoticed except for the areas of open rock that are clearly visible near the summit. I have long wondered about the view from those rocks. Given that the summit is less than a mile (as the crow flies) from the Long Lake Reservoir I figured it could be done in a few hours; maybe a half day.

Taking advantage of the 4th of July holiday I set off to see. Turns out there are very good views. From the summit the view to the north is mostly open and with some exploring good views can be found for nearly every direction. I was a bit over optimistic on the difficulty however; the trip was not quite the half day outing I had expected. The seven mile round trip took 6 hours of nearly continuous walking and by the end I was very happy to see the car. Pretty much every bushwhacking trip I take turns out to be harder than expected. Maybe there's a lesson to be learned from that. Nah, the next one is bound to be easy.

From the summit of Burnt Mountain. Looking Northeast towards the High Peaks.
From the summit of Burnt Mountain, looking Northwest; Click on the photo to see the full size image and you can just make out a sliver of Long Lake in the upper left. Kempshall Mountain is the prominent rounded mountain in the right center with Blueberry Mountain just to its' left. Blueberry Mountain is another one of those trail-less and infrequently climbed peaks with great views. In the full image you can make out some of the south facing open areas on Blueberry mountain. And there are extensive open rock areas on the west side with great views of Long Lake.

From an opening on the south side of Burnt Mountain looking Southwest towards the west end of the Fishing Brook Range. 

Overview of the route. The first mile and a half is along the Northville Lake Placid Trail (NLPT) from Rte 28n. On the way up I passed the Long Lake Reservoir and walked due east until the slope steepened and turned south to angle towards the notch. For the return I followed the small brook that flows out of the notch on the south side of Burnt Mtn. down to Sandy Creek. Crossing the creek I continued west until I ran into the NLPT. As the day warmed the flying vermin started to find me in large numbers and I was highly motivated to find a trail where I could move along at a quicker pace. (image from Google Earth) 
Google Earth terrain view showing my circuitous route around the summit in more detail. The open rock on the left seemed like a good bet for by-passing the conifer thickets seen here in darker green, but the rock was a little steeper than liked for a solo bushwhacking trip so I beat my way through a lot of brush.

I hiked up to the notch on the south side of the mountain (on the left) and climbed up to the summit from there.  That route  was steep and passed through areas of dense thicket. Seeking an easier route I came down the east ridge (on the right). That way was much easier but left a climb of a couple hundred feet back up to the notch.  

It may be that the easiest route up Burnt Mountain is not up from the notch on the south but instead would work around the mountain on the north side and up the northeast slope to the top (upper right in the photo). The second growth forest on the north side of the mountain is Beech-Maple though nearly all of the large Beech trees have succumbed to Beech Bark Disease (BBD). Still, the forest is relatively open and easy to navigate with large Maples and Yellow Birch that I estimate to be in the 80-100 year age range. The only issue with climbing the mountain from the northeast is that the state land boundary crosses Burnt Mountain just east of the summit. So staying on public land might force you onto a less desirable route.


Spiders gotta weave

As always I was on the lookout for ecological anomalies. I didn't spot anything really notable but the notch on the south side of the mountain is pleasant and feels remote. The forests south of Rte. 28 are mostly mature second growth consisting primarily of Sugar Maples, Yellow Birch, Hemlock and on the higher slopes, Spruce. Many trees have reached full height with ABH diameters greater than 24 inches with a smattering of older trees with diameters approaching 36 inches. One notable tree was a Beech seen on the northwest slope of the mountain with a diameter of 36 inches. It was tipped up from the roots sometime in the past year or so but it looked to have been in good shape when it went over. The wood was still sound and there was very little indication of BBD. Had I seen it before it went over it would have been a notable specimen.

One final note; my father grew up in Long Lake and hunted in these woods as a young man in the 1950s. He tells me that there is an interesting cave somewhere in the notch on the south side of Burnt Mountain. No doubt the forests are much thicker there now because I saw no sign of it. Maybe next time.

Wednesday, May 27, 2015

Siamese Lakes Wilderness - Big Shanty River Driving Camp

Memorial Day; May, 25th, 2015. A thirteen mile round trip hike into the northern half of the 114,000 acre Siamese Ponds Wilderness. From Rte. 28 in North Hudson, turn (west) at the DEC sign for the Siamese Ponds Wilderness and Thirteenth Lake. Follow the signs to the "Old Farm Clearing" trail-head. There is a large parking area.

The "Old Farm Clearing" trailhead is a major access point for the Siamese Ponds Wilderness. My plan was to follow the main Sacandaga East Branch trail approximately seven miles to the suspension bridge that provides access to to the ponds for which the Wilderness area is named. There's a Lean-to near the bridge but nothing special about that location. It just seemed like a good turn around point and seven miles (each way) was fairly ambitious for this time of year.

I  didn't make it quite that far. Over the past few years my hiking mode has evolved into a slow (but steady) ramble through the forest. I peer into the woods looking for trees that are not like the others, plants that shouldn't be where they are, birds, other wildlife, unusual rock outcropping, signs of past human activity, elves and whatever else catches my eye. I take a lot of little side jaunts when I spot something interesting. So even though I left the car at 9:30 I had not reached the lean-to by my 1:30 turn around time. I figured I had maybe three-quarters of a mile left to go on the seven mile distance.

Not reaching the lean-to was of no concern but I was on the lookout for a sign for the "Big Shanty Lumber Driving Camp" mentioned in the 1994 edition of the ADK Guide to Trails of the Central Adirondacks. I didn't have the book with me but I thought it was located about a mile from the lean-to. If that was true, then I should have reached it. Of course, it might have fallen down or it might have been removed by a Hun or Vandal. And not knowing exactly where it was located, or even what it looked like, I might have simply missed it.

Oh well, time to turn back. Except, I could see a small clearing just 50 another yards down the trail. This one looked to be no different than a half-dozen others passed along the way. But why not, I decided to go just that bit further. And there it was, 20 feet off the trail. Just as the ADK book described it, large and rustic.

Big Shanty River Driving Camp, 1890.
I'd love to know the story behind this sign. Based on the rate of decay in the Adirondack forest it couldn't be more than 30 or 40 years old. But that's just a guess. If anyone knows more about this sign, and who put it up, please leave me a comment.

As for the rest of the hike, it was your standard late May outing in the Adirondacks. I participated in the annual Black Fly Count. And having encountered only a few thousand I can say with confidence that Black Fly numbers are way down this year. Or maybe the little buggers are just bidding their time. Waiting for warmer and wetter weather.

The Old Farm Clearing. There was some kind of tree farm surrounding this location and the clearing is well on its' way to filling in.

There are stands of  large hardwoods, including this Maple, along the trail. What I would call large second growth. Based on size and the bark I'd estimate this tree to be at least 150 years old. If so it would have been a small tree when this land was logged in the later part of the nineteenth century.

From the bridge over the East Branch of the Sacandaga River. Very low water following six weeks of dry weather.

East Branch of the Sacandaga (looking north) from near the Big Shanty sign.
Flood plain of the East Branch a couple of miles upstream from the Lean-to and suspension bridge. Very low water 
There are a few very large White Pine scattered through the forest along the river. This tree has to be 150 years old or older. How did it escape the loggers saw? Maybe they weren't interested in White Pine at that time.


Wednesday, May 20, 2015

Moreau Lake State Park Boundary (KML) for Google Earth

This is a follow up to my recent post on the addition of lands formerly held by the McGregor Correctional facility to Moreau Lake State Park. That post included a map image with a rough outline of the newly added parcel. I've refined that boundary and saved it to a KMZ format file that can be opened in Google Earth/Maps.

Link to the Moreau Lake State Park Boundary File
https://drive.google.com/file/d/0B3QHBL0PwDqWZFpxSG9nYU1BY0E/view?usp=sharing

Clicking the link will open a new browser window (or tab) showing Google Maps with the boundary layer displayed as an overlay. You can also download the boundary from Google Maps by clicking the Download Button (down arrow icon) on the Google Maps toolbar. The file is in the KML/KMZ format native to Google Earth/Maps. If you have Google Earth installed on your computer you can double click the downloaded file it to open it.

Image 1: Moreau Lake State Park Boundary.
Note: These boundaries are approximate and not official in any way. (Base map source: Google Earth)
The red outline represents the boundary of the main section of Moreau Lake State Park. The newly added "Lake Bonita" section is shown in blue (lower left). The area in brown (near the top) is the section along the Hudson River and north of Spier Falls Road, The section with the green outline is the area east of the Hudson (previous post on this here).

Image 2: The same boundary outlines viewed as an overlay in Google Maps. 
Viewing the boundary layer in Google Maps you might wonder why the outlines I've provided don't match the park boundary shown tinted light green. Most striking is that Maps only shows the main section of the Park. Probably because the data that Google used as the basis for the parks layer was created before the section east of the river was added. That question of "when was the data created" also applies to the new Lake Bonita section. The boundary outline I've provided was digitized from images provided with the press release announcing the land transfer (so again, it is only approximate).

Perhaps the most interesting discrepancy is the area outside of the red outline seen just below and left of Moreau Lake. That's not newly added so, is it in the park or outside of the park? It's probably a data error in Google Maps. No other source that I've seen includes that acreage in the Park and if you zoom in, as seen in Image 3, we see that there are streets located there. I know from having been there that there are houses on those streets so that area is probably not inside the State Park.

Image 3: The section in green, but outside of the red outline, is probably a data error. (Source Google Maps)
The outlines I've shared were digitized from base map layers obtained from several sources. My starting point was the official Park map and I edited and added detail using a base map layer from ArcGIS Online (Esri). My point in discussing these discrepancies is that geographic data usually represents a moment in time. If our subject of interest is represented by data that changes continuously then we can consider that data to be out-of-date the second we save it to a database. Even something far less dynamic --a State Park boundary for example-- will change over time and representations provided by varied sources will not necessarily be in agreement. And then there are errors of all kinds and the question of accuracy. But that's another whole story.

As a representation of the real world geographic data is uncertain. And uncertain is not the opposite of certain. It's a lot more complicated than that.


Monday, May 11, 2015

Lake Bonita - Moreau Lake State Park

It's not every day that a favorite local State Park has a good sized chunk of land added on. Especially when that addition includes an attractive lake that was previously off limits. But this is exactly what has happened at Moreau Lake State park. It was announced last week (May 2015) that 750 acres formerly controlled by the Mount McGregor Correctional Facility have been added to the park (official press release here).

A rough map of the area added to Moreau Lake State Park. The light blue outline shows the approximate boundary of the addition. Lake Bonita lies entirely inside the newly added parcel as does the Grant Cottage historic site. The red line represents the previous Park boundary and the colored lines inside that boundary show existing trails. Wilton Road passes through the addition and the prominent forest cut that intersects with Lake Bonita (from the top of the map) is an abandoned power line right of way. The even more prominent straight cut (gap in the forest) is a current power line ROW.  The buildings and infrastructure of the former correctional facility were not added to the park pending possible redevelopment. Note that the new parcel outline shown in this map was drawn by hand and is only approximate. The map is from Google Earth.

The minimum security Mount McGregor facility was closed in 2014 by New York State in a cost cutting move. Given that the 1100 acre Corrections property is mostly forested --and that it shared a 1.5 mile long boundary with Moreau Lake State Park-- the possibility that some portion might be added to the park received immediate local interest and support. Best of all, the corrections property included all of Lake Bonita. Lake Bonita is a 50 acre reservoir backed up by 150 foot long earth and rock fill dam across the headwaters of Beaver Brook (information on the dam). The lake is quite attractive and during a short visit on May 10th (2015) we saw a variety of water loving birds and what appeared to be Rock Bass spawning near the shore.

But the lake's most appealing characteristic is that it is undeveloped. A well maintained gravel road reaches the dam from Wilton Road and a second road reaches the east end of the lake from the former McGregor facility. The lake was the water supply for the prison and a pump house at that point is the only building visible on the entire lake shoreline.

The press release announcing the land transfer from Corrections to the State Park system noted that access is currently limited by a lack of parking and the absence of trails. We took that to mean that it's OK to visit if you can get there. Which is not to difficult if you are willing to hike and do a little bushwhacking. Probably the easiest way to visit right now is to hike the existing trail from Spier Falls Road to Lake Anne. Lake Anne sits right on the old property line between the Park and the Corrections department lands. From Lake Anne it is about 3/4 of a mile cross country to Lake Bonita. The only challenging part was getting around the extensive marsh found at the southeast end of Lake Anne. You could walk for a ways and then turn towards the lake, but it's been so dry that we went straight through it. We managed to keep our feet dry but we picked up a few hitchhikers while beating through the underbrush. Tick precautions are required if you go off trail anywhere in Moreau State Park.

Looking down the lake from near the east end. The dam is out of sight around the corner to the right.

Lake Bonita from near the dam. The lake is approximately half a mile long and 300 yards across at the widest point.


The dam on the northwest end of Lake Bonita.


History of Mount McGregor Part 1
History of Mount McGregor Part 2

Saturday, February 14, 2015

Geyser Creek to the Kaydeross

Most visitors to Saratoga Spa State Park experience Geyser Creek by strolling to see the impressive travertine deposits along its' banks or as the lovely stream that flows through the Geyser Creek picnic area. Fed by deep springs, the creek's waters are cool and attractive on even the hottest summer days. From the picnic area a trail follows the stream to the bridge that carries the park East West Road over the creek. At that point Geyser Creek is 20 feet wide and it typically carries a good flow of water. Downstream from the bridge you can see that the the creek flows into a swampy area, but there is no hint that within a quarter of a mile the stream will have all but vanished into that swamp. Water does flow out the other side, but that flow is in the form of seeps and trickles that add to the Kaydeross at various points. Some maps show Geyser Creek as a continuous line from the bridge to the Kaydeross, but don't believe them. There is no single, reliable, channel.

For much of the year bushwhacking into this area is a daunting prospect. Two small ridges punctuate the marsh but most of the area between the Park East West road (on the north) and Northline Road (on the south) is relentlessly wet, muddy, overgrown and buggy. During times of high water it's an impassable quagmire. The few people who visit the area mostly do so from the Kaydeross Creek. I've written previously about floating this stretch of the Kaydeross and a determined explorer could leave the creek at any number of points. As the crow flies it's just over two miles from the Canoe Launch at Gray's Crossing (Northline Road) to the launch site on Driscoll Road. The creek, however, takes four miles to cover that distance and the elevation differential is less than 20 feet. This is a flat landscape.

But there is one time of year when it is possible to enter the area on foot. In the dead of winter you can readily cross the frozen muck and mire to get a closer look at the topography and forests if not the impressive variety of flora and fauna seen during the warm weather months. Figure One shows a scene looking across the Kaydeross during the blizzard of Feb. 8, 2015. It was snowing hard.

Figure One: The banks of the Kaydeross during the blizzard of Feb. 8, 2015. Snow was falling at a rate of 2 inches per hour adding to the already deep snow pack. 
Lest you think I'm being overly dramatic talking about the conditions as a "blizzard'. You can judge for yourself from this short video. Watch the video in full screen to get the full effect.


Figure two shows my route. The snow pack was deep and airy so I left the parking near the Rte 50 Park entrance with my show shoes on. I first followed the Wetlands Overlook trail and then an abandoned road to reach the closed (and capped) Park Landfill. From there another abandoned Park road leads southwest into the forest. After a short distance I left the old road (on the left) bearing south and downhill to the edge of the swamp. I followed a route I had worked out ahead of time across the marshes and a small ridge to the Kaydeross. This route was selected to allow me to stay on State land though it's a somewhat arbitrary point in the winter. The trip covered only three miles for the round trip but with the deep snow and harsh conditions it seemed further.

Figure Two: Route from Rte. 50 parking to the Kaydeross
Map Image from Google Earth
Figure Three was made from the Ecological Communities map in the Saratoga Spa State Park Master Plan. The map legend is shown separately in Figure Four. This map also shows the outline of the State Owned lands and my route is represented by the prominent red line.


Figure Three: Ecological Communities - Saratoga Spa State Park south of the park East West Road. The red line shows my route.
Map Image captured from the Park Master Plan
Figure Four: Ecological Communities Map Legend
Image captured from the Park Master Plan
The Ecological Communities map shows the area to be a matrix of wetland community types with forest and successional fields mixed in. This is a rich ecological mix with the oxbow lakes and vernal pools being especially noteworthy. A vernal pool is an area that is reliably wet each spring but also completely dry for at least part of the year. That means no fish will be present and no fish makes vernal pools an attractive breading habitat for amphibians. Two vernal pools are shown on the map but there are certainly more. One reason that wetland complexes like this are so interesting is that the conditions are highly variable and the lines between community types are constantly being redrawn.

The weather on this day was harsh so most birds and beasts were keeping a low profile, I did see White-Tail Deer and common winter birds; Crows, Juncos, Blue Jays, a Hairy Woodpecker and a Pileated Woodpecker. In warmer weather this area is particularly rich in bird life and it is a designated Bird Conservation area. This is as good a place for bird watching as can be found in northeastern New York.

And my destination for this hike was not selected at random. I knew that the remnants of an old dam can be seen about half way between Grey's Crossing and Driscoll Road. You can find the location in the maps above because my route ends there. But the distinctive 90 degree change of direction taken by the Kaydeross at that point makes it easy to spot on any map. The broken down spillway creates a rapids and, even in this very cold winter, that's enough to maintain a small area of open water (Figure Five). As I approached the edge of the creek two White-Tails dashed into the woods. The ice around the open water was covered with deer tracks and we might surmise that they come here to drink.

Figure Five shows the spot but the flat light and deep snow make it difficult to see the outline of the former structure. I wonder when the dam was in use and its' purpose. I have not found much in the way of specific information about the dam or this area in general. If you know more, or have sources for this information, please leave a comment.

Figure Five: Open water below the old dam on the Kaydeross.